
Part 2. Create a real-time drawing game with Flutter
Table of Contents
Sharing my Trouble Painter making log.
👉 한국어 버전
Part 1. Trouble Painter - Drawing Mafia Game
✔︎ Part 2. Create a real-time drawing game with Flutter
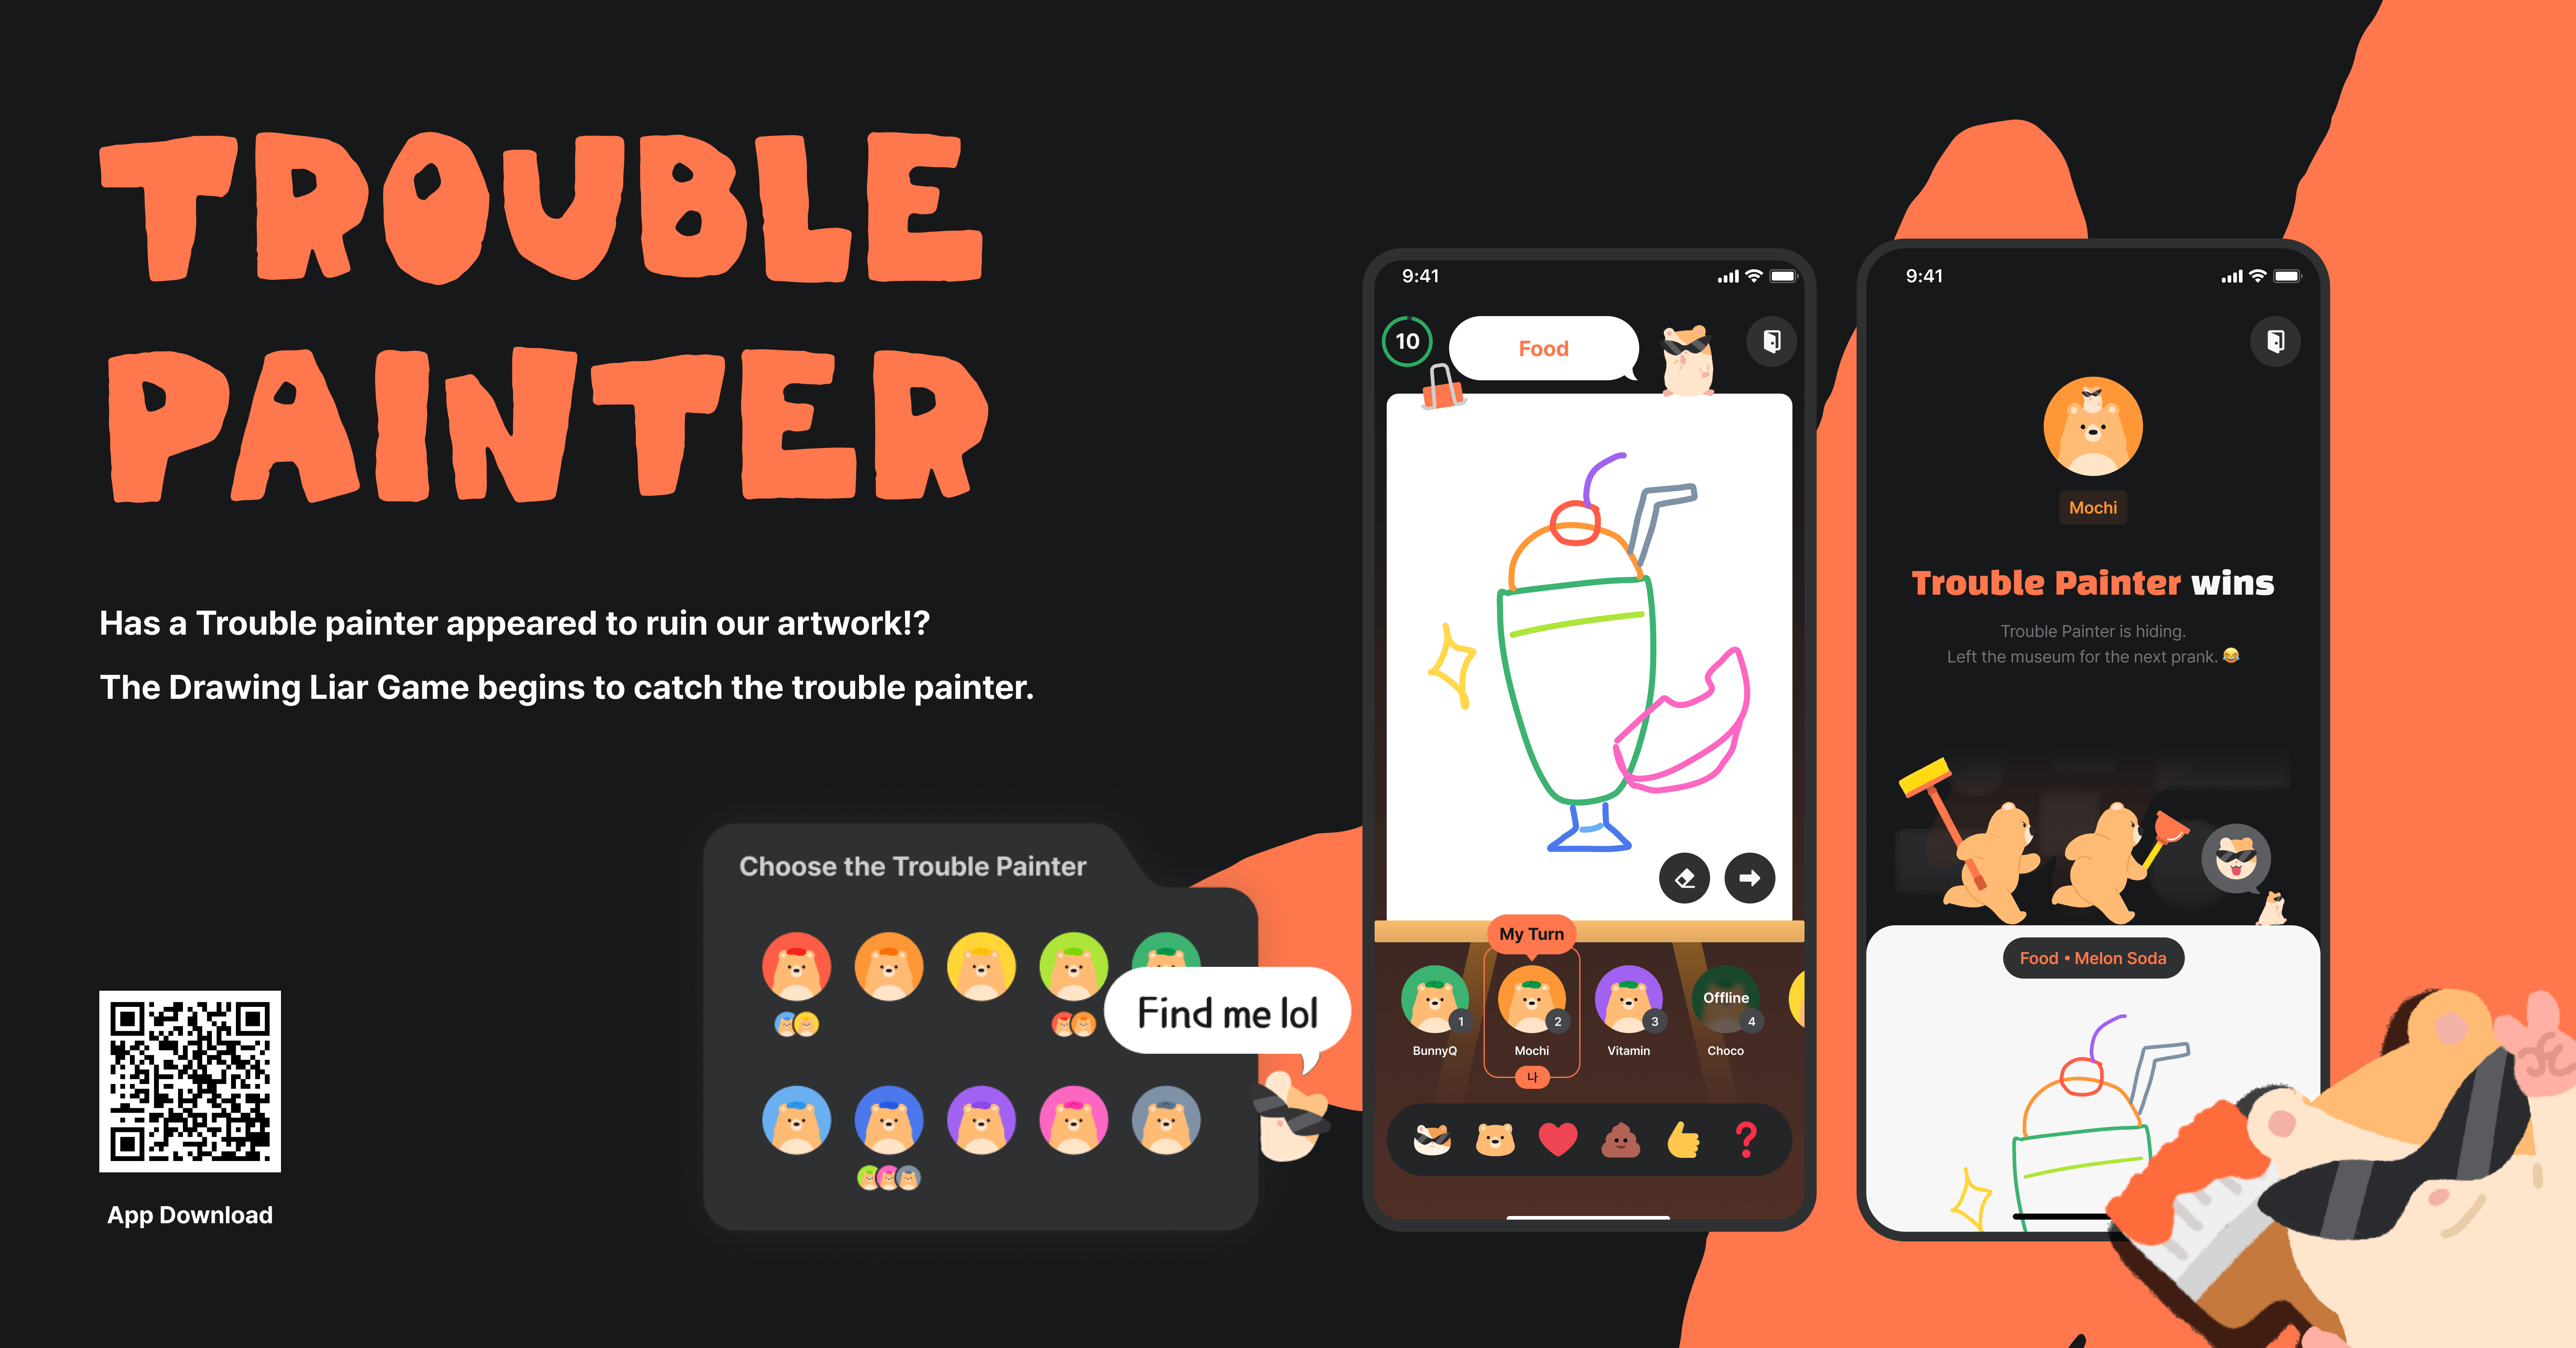 Trouble Painter is a drawing mafia game where you find trouble painter hiding among good painters.
Team Xorker
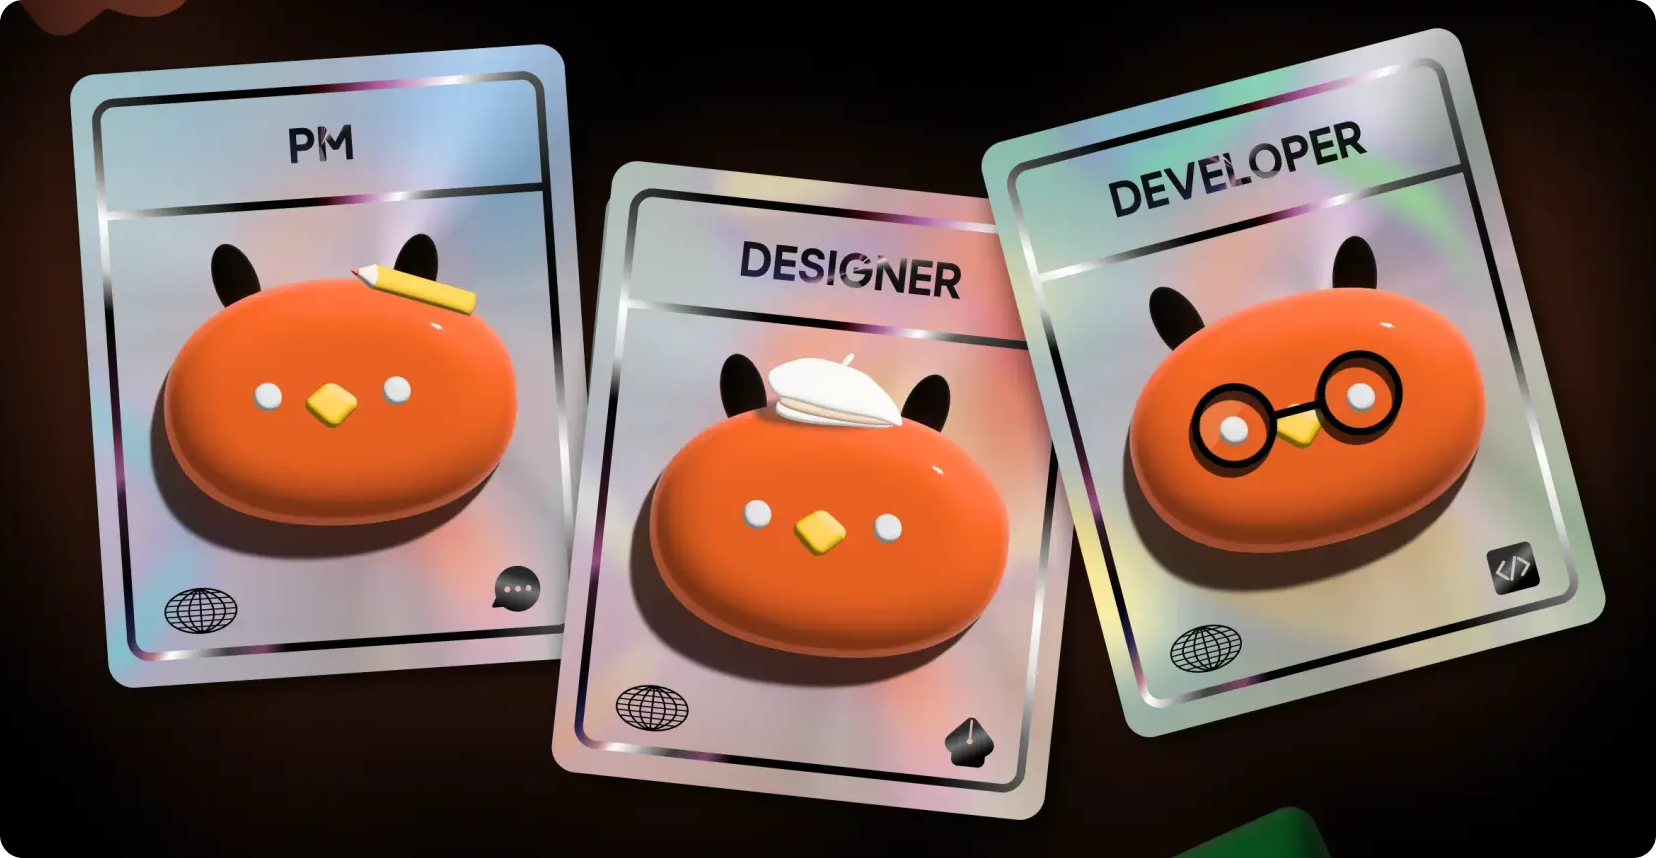
Team Xorker is a team of 7 people, including 1 PM, 2 designers, and 4 developers (Flutter 2 / Spring 2) who gathered from the 24th YAPP IT club.
 YAPPO(YAPP Mascot) was created by designer Xorker!
Source - YAPP
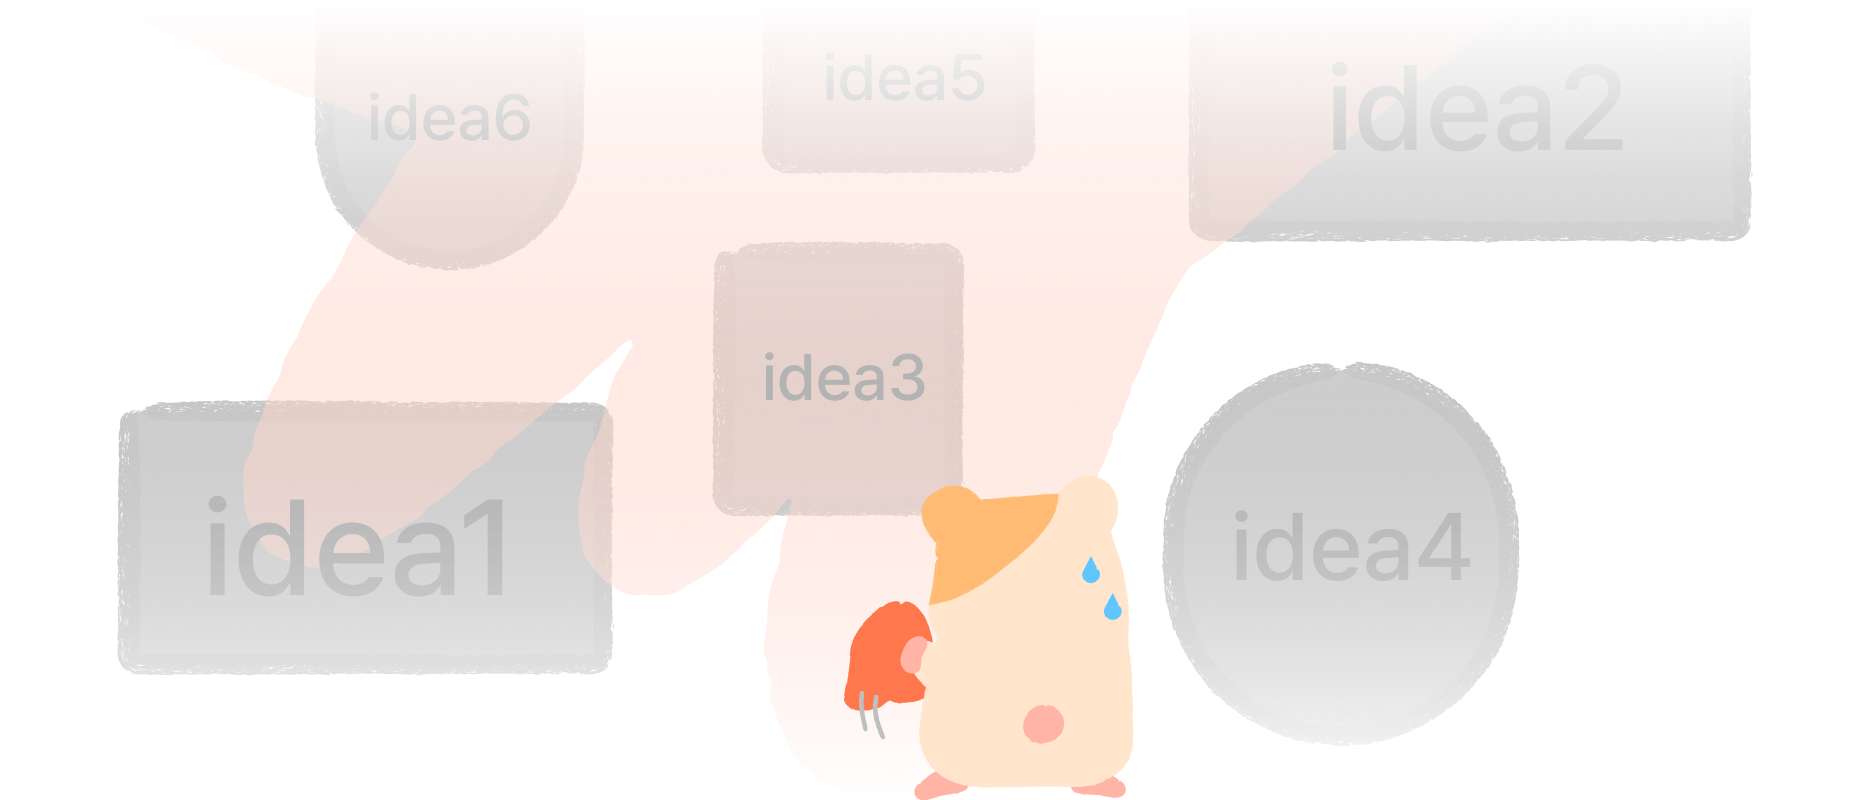
Ideation
At first, we chose the idea of a service that can be used for self-growth and PR by receiving feedback from colleagues and proceeded with it. However, as time passed, we were unable to solve the problem of “Will people be able to leave honest feedback?”, and decided to change the idea after 4 weeks of team building. 🥹
After that, we set a deadline of one week and discussed new ideas again.
🐶 Pet-based dating app: Rejected due to problems gathering initial users & lack of empathy for the dating domain!
📝 AI pet diary service: Rejected due to there is only one team member who raises a pet, and it seems that even that team member would not use it!
🧩 Board game mobileization: Rejected due to lack of planning for the game & burden of graphic-focused work!
 I think the idea selection process is the hardest 😵💫
Since the process of rejecting items with different criteria was repeated, we discussed the goal that everyone agreed on and set a qualitative standard of the item that will receive the most attention at the demo day.
While discussing the item with that standard, the idea of a game where you draw pictures in real time to find the mafia came up. When we played it as a mockup in Figma, it was fun and didn’t seem like much graphic work was required in the plan. Decisively, if the item is well implemented, it seems that it will receive the most attention at the demo day, so Trouble Painter was born 🎉
Demo Day was conducted in a way that other IT clubs invested mock money in the teams they liked the most, and as a result Trouble Painter was able to achieve the goal of attracting the most mock investment money and getting the most attention. ✌️
Project Management
We used Jira as a project management tool and conducted sprints in one-week units. In the beginning, all teams conducted sprints in the same functional units, but Flutter was dependent on the work of the design and backend teams, so the Flutter team pushed back their sprint by a week.
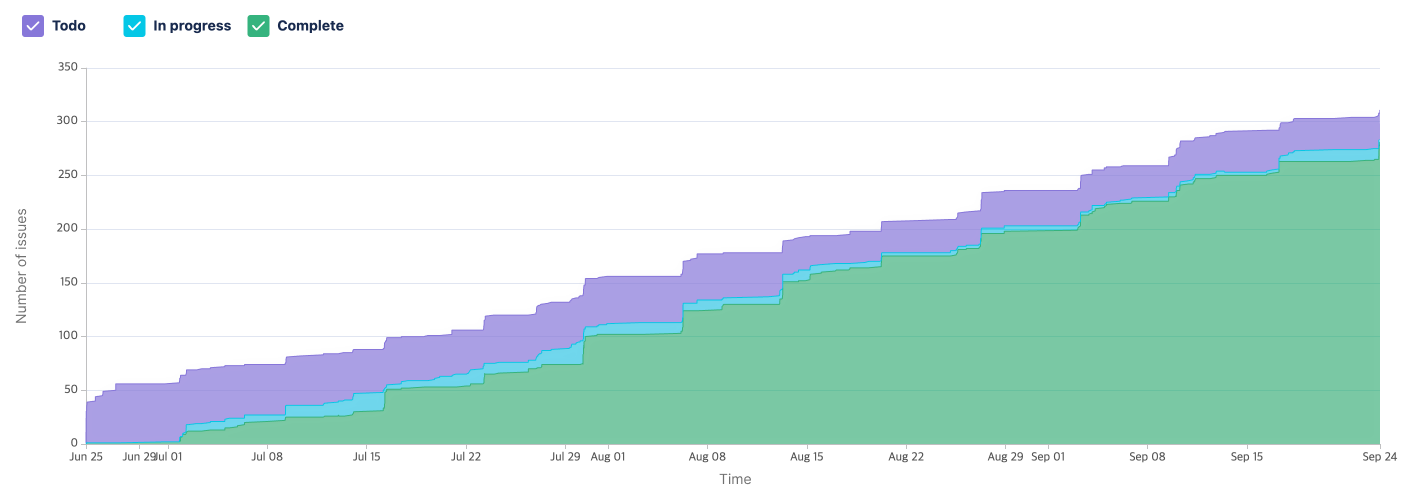 Sprint cumulative flow diagram for one week
We conducted a 3L (Liked, Learned, Lacked) retrospective in two-week units, and looking back at the time of writing, I think the retrospectives improved communication within the team and helped us change ideas. 👍👍
Schedule Management
We planned the schedule with the goal of store distribution 5 weeks before Demo Day. There was an issue where the idea changed in the middle, but we continued with the original plan even though we knew it was an unreasonable schedule for the start dash.
The actual schedule from the time we changed the idea to store distribution based on Flutter work is as follows.
| Schedule | Flutter work |
|---|---|
| week 4 of June | Idea change |
| week 5 of June | Developing MVP for user testing based on Firebase |
| week 1 of July | Architecture design & building store distribution automation |
| week 2 of July | Building a design system |
| week 3 of July | Implementing business logic |
| Week 4 of July | Design Reflection |
| Week 1 of August | WebSocket Design |
| Week 2 of August | Server Integration |
| Week 3 of August | QA & Store Distribution |
Although it was two weeks later than originally planned, we were able to create a websocket-based real-time game and distribute it to the store in just 7 weeks.
User Test
A user test was scheduled for a week after the idea was changed. So I created an MVP app service for user testing for a week using the real-time communication function of Cloud Firestore.
Since I had set up an internal test environment with Firebase App Distribution and Fastlane in the beginning, I was able to distribute the MVP app to the team and conduct user testing without any problems.
Here are the things we learned from this user test
- The UI of general apps is familiar to users because they have already learned it, but game UI is unfamiliar and requires learning.
- Games that automatically transition screens and have time limits must be designed to be more intuitive in terms of what to see and what actions to take.
- Most users do not read tutorials, and even if they do, they do not easily understand the game rules.
Design
The design team is a passionate team that fills 6 pages until the final design comes out 🔥
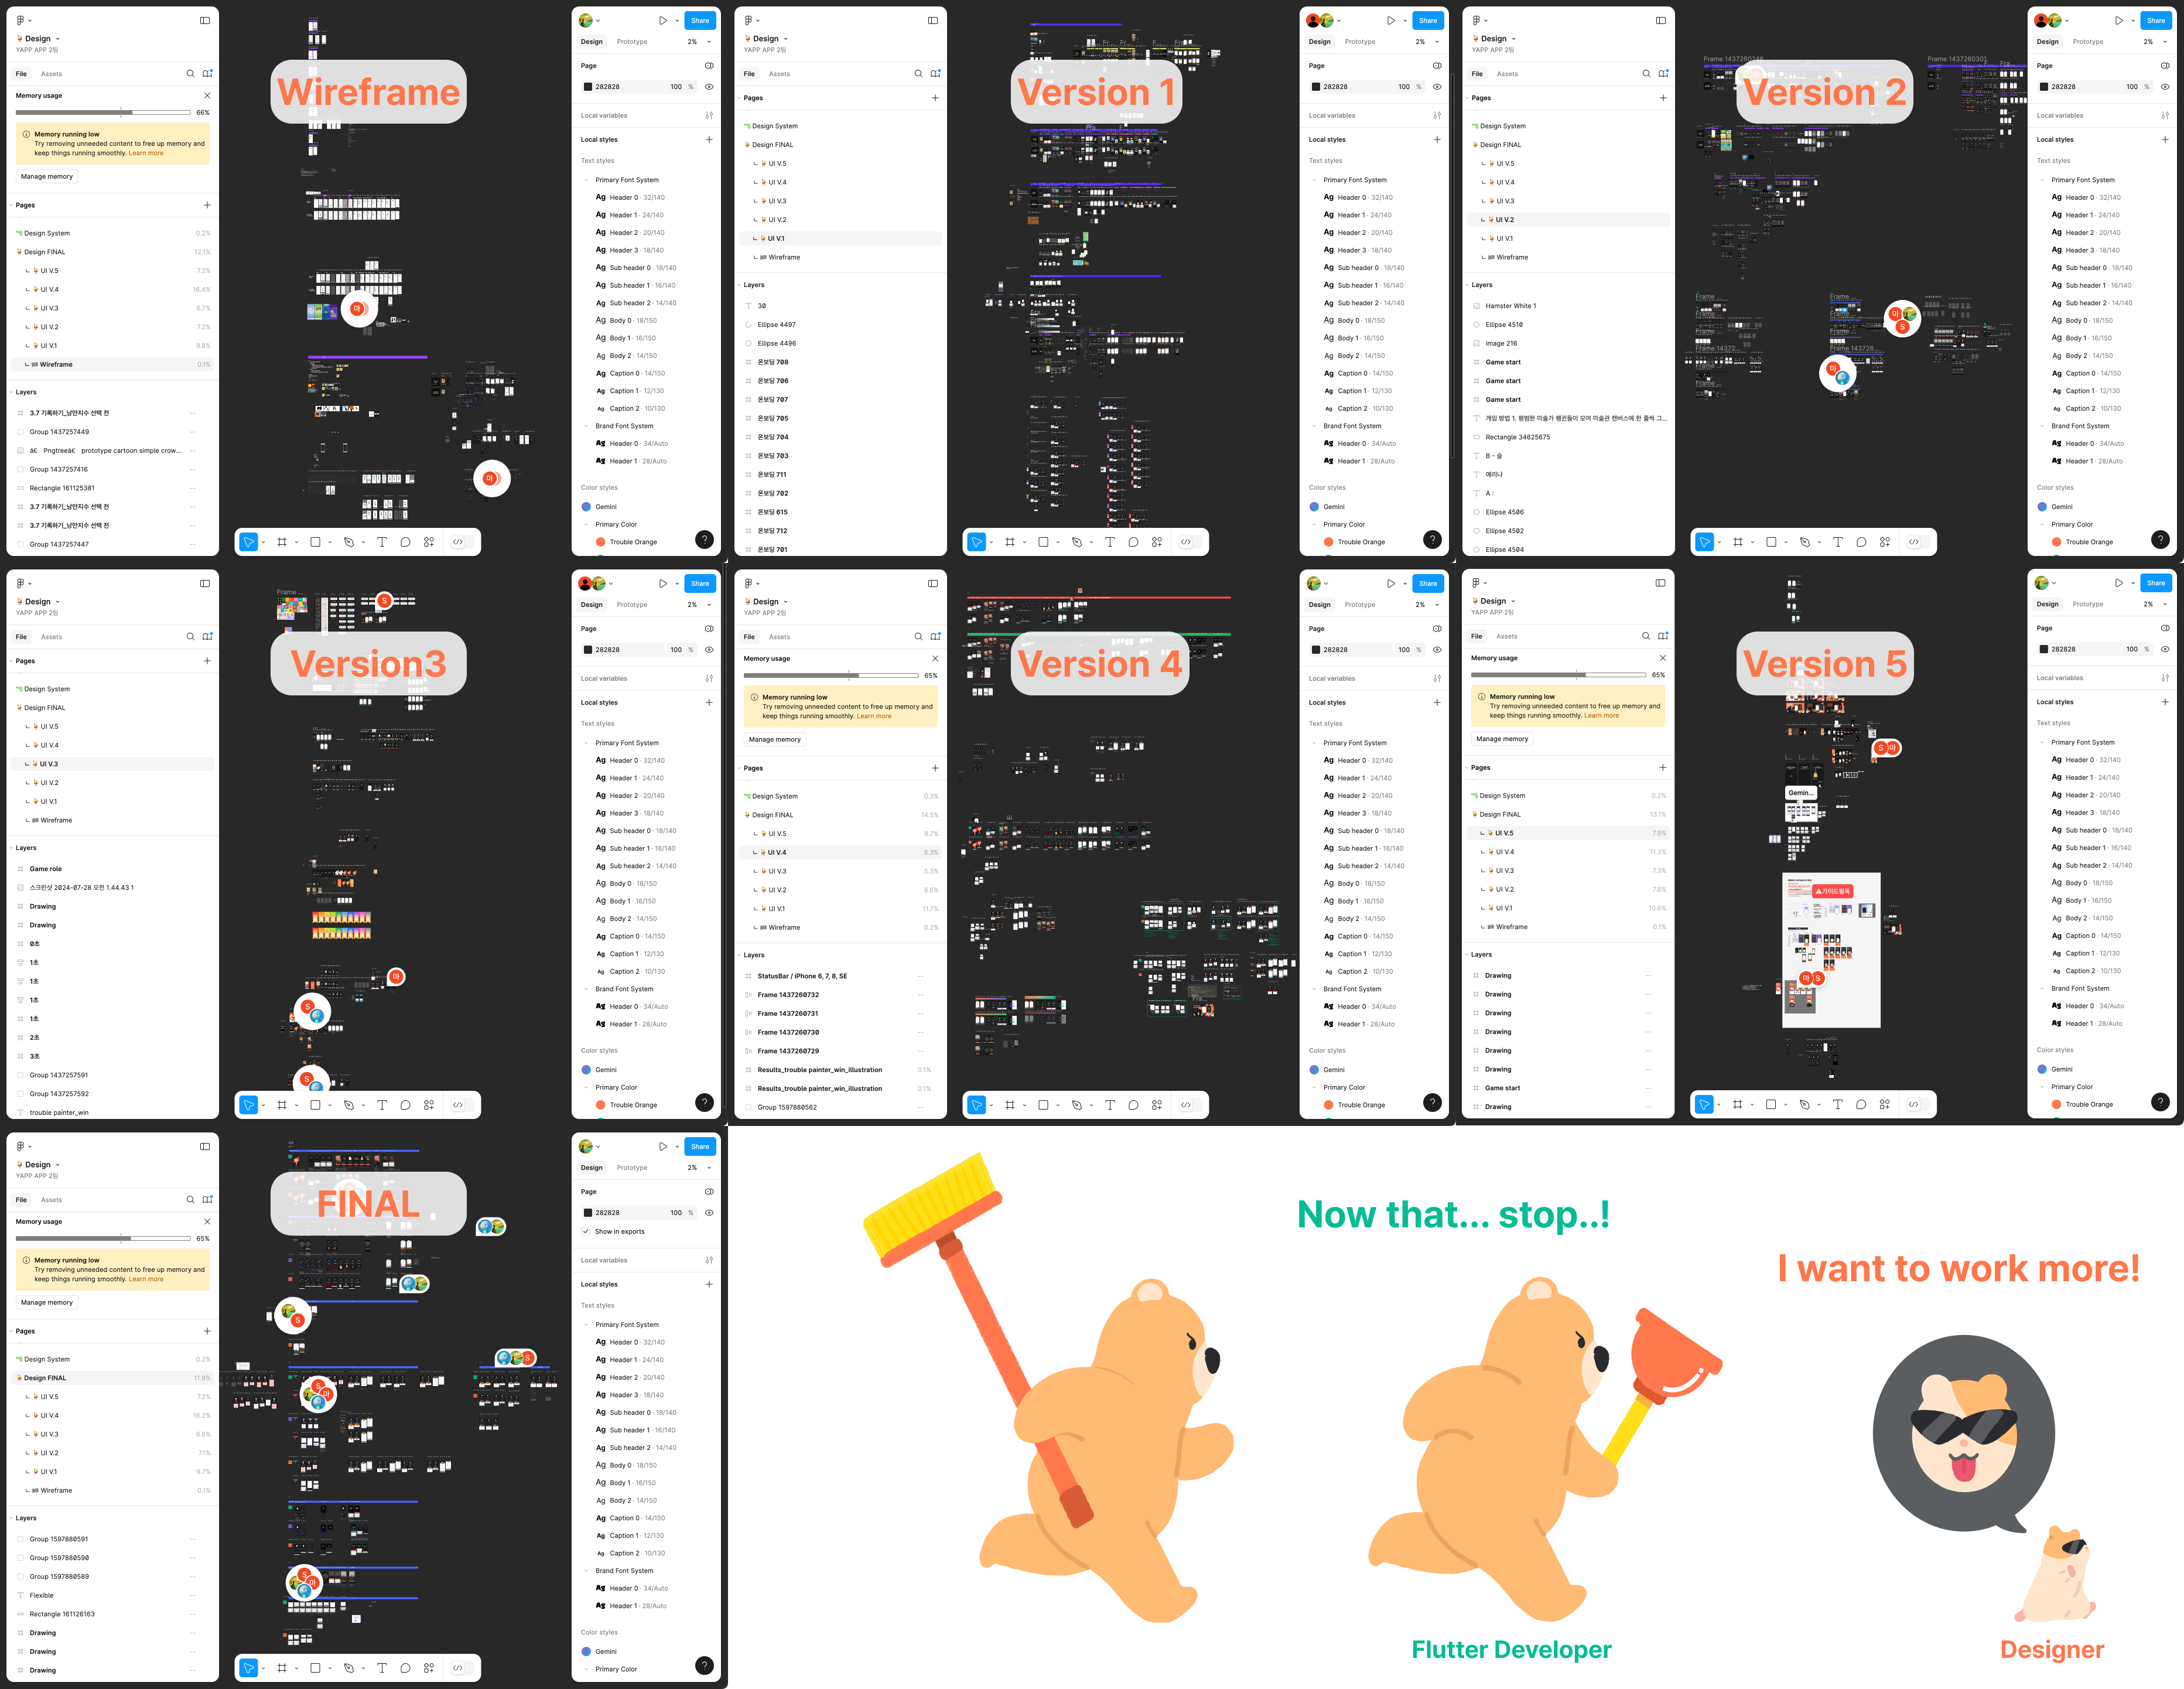 Designer.. Figma won't open.. Stop it now..!
 I'm not joking, it really won't open
UI & UX
Reflecting what we learned during the user test, we played the BGM of the waiting screen and the BGM of the play screen differently to create a more exciting atmosphere at the start of the game.
In the initial game preparation page, too much information was shown on one screen, including categories, roles, and orders, which did not convey the information well, so we changed it to show only roles and categories, and added characters to make the roles more intuitively recognizable.
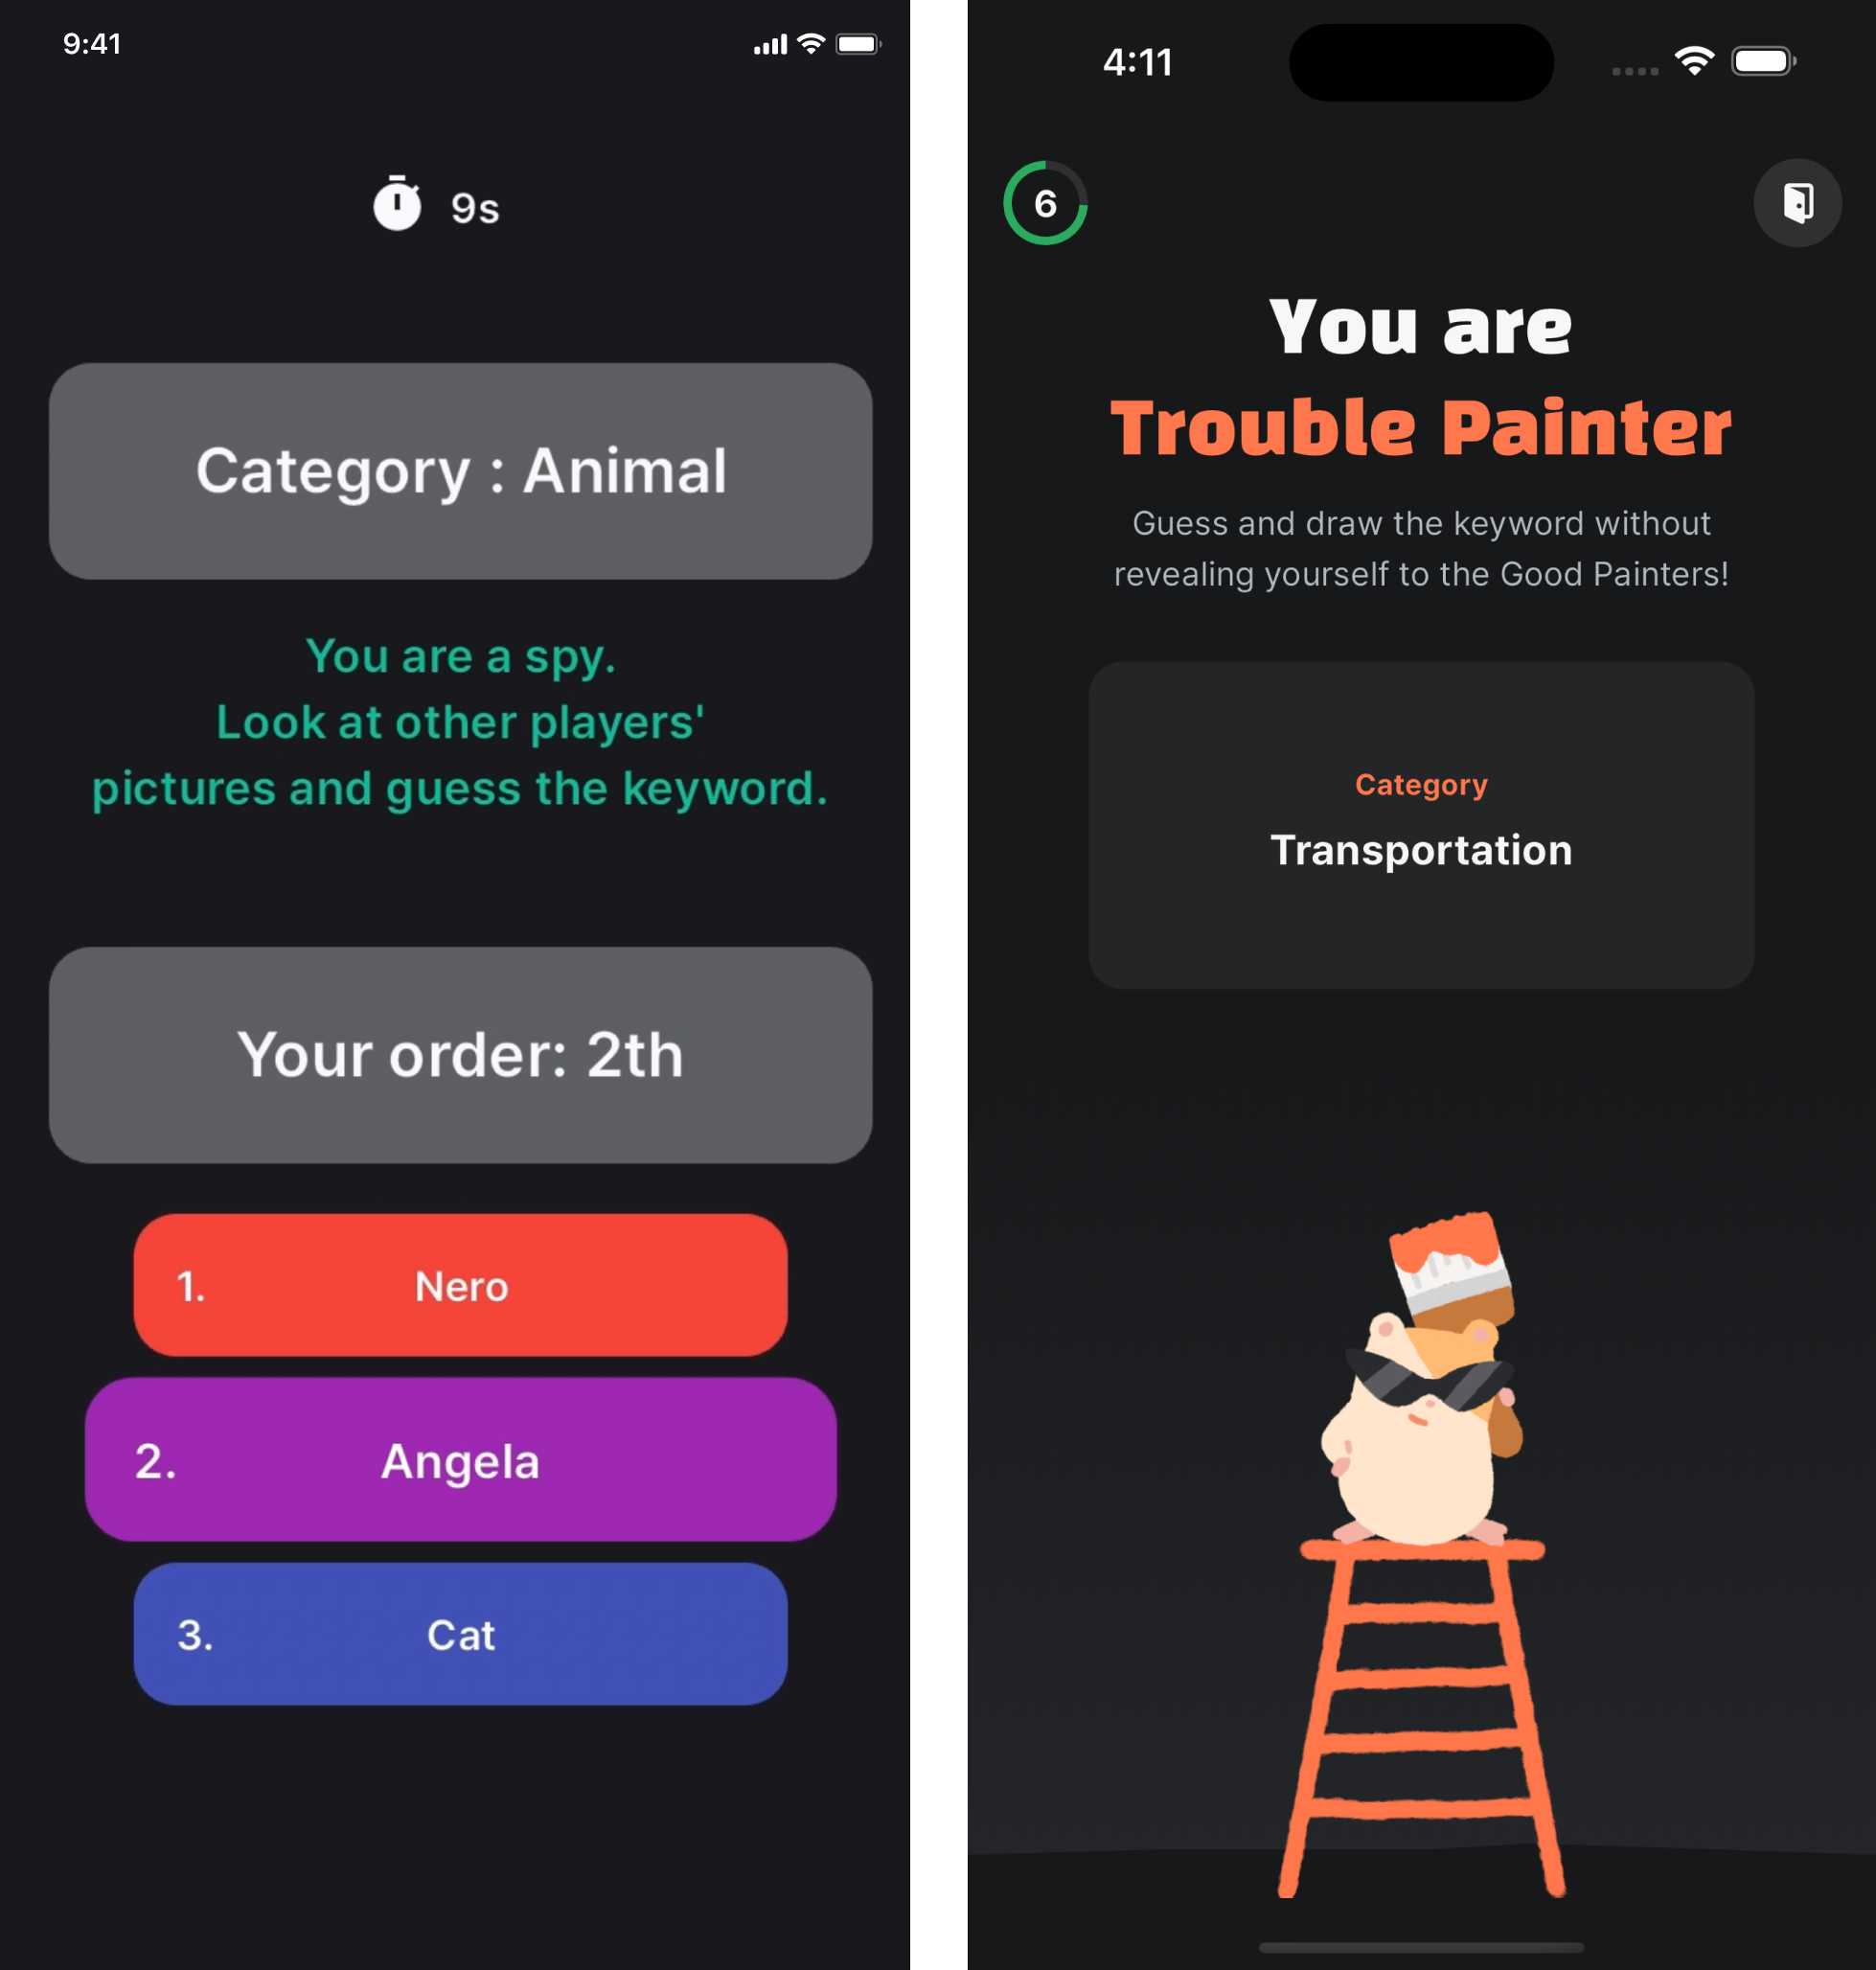 (Left) Initial screen for user testing
(Right) Improved screen
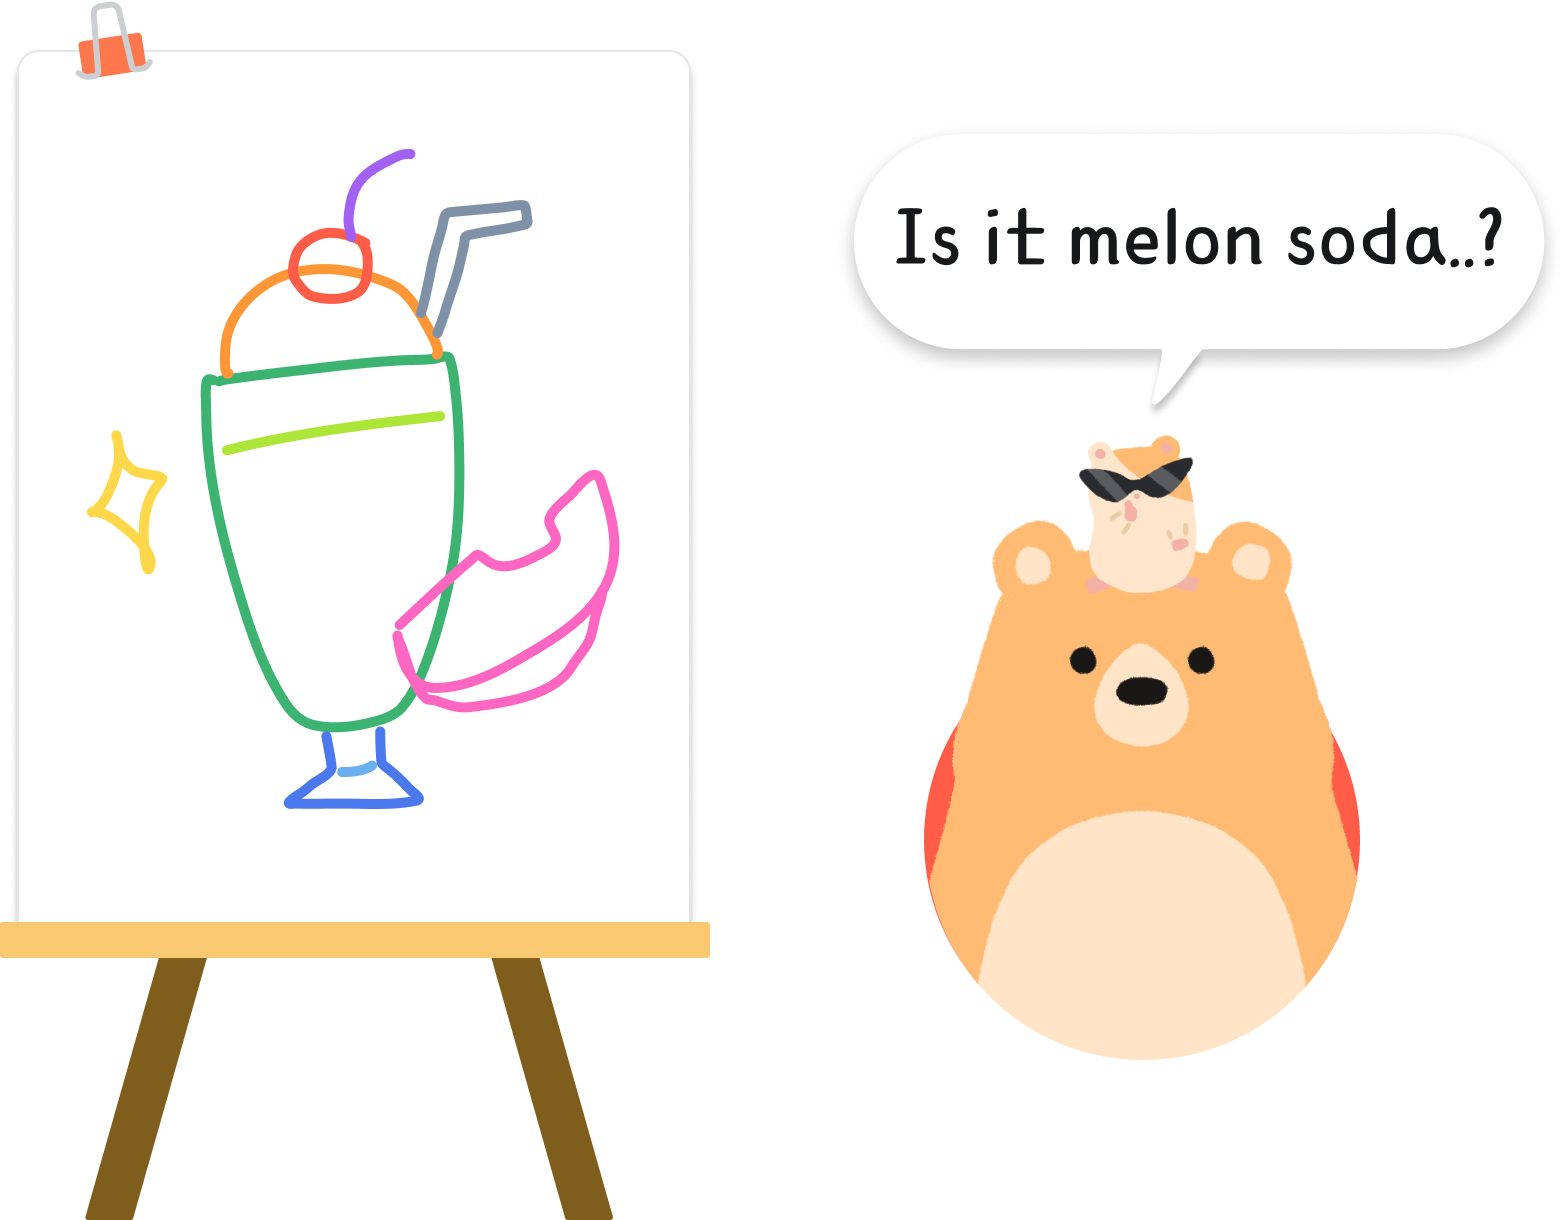
Your turn was shown with a drawing screen round animation, and the problem of not recognizing it even when it was your turn was improved by changing the background color and playing a single-stroke guide animation. This allowed us to learn the game rule of drawing only one stroke per turn in the middle of the game.
Characters
The roles of the mafia and the citizens in the mafia game are expressed as the Trouble Painter and the Good Painter, and the hamster and bear were chosen to design the two characters to show the difference in size and personality.
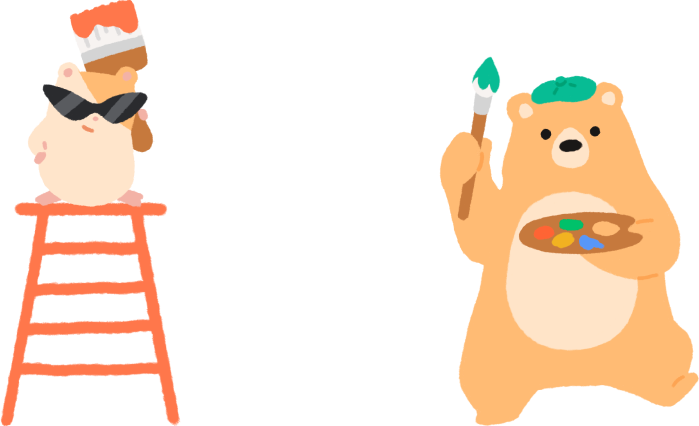 (left) Trouble Painter, (right) Good Painter
Also, in homage to the movie Ratatouille, the concept of the Trouble Painter hiding inside the hat of the Good Painter and drawing pictures while hiding his identity was incorporated into the UI.
 A trouble painter who answers the questions above a good painter's head
Design System
In order to increase work efficiency and lower communication costs, we built a design system, and since the light theme does not fit the game concept, we only support the dark theme.
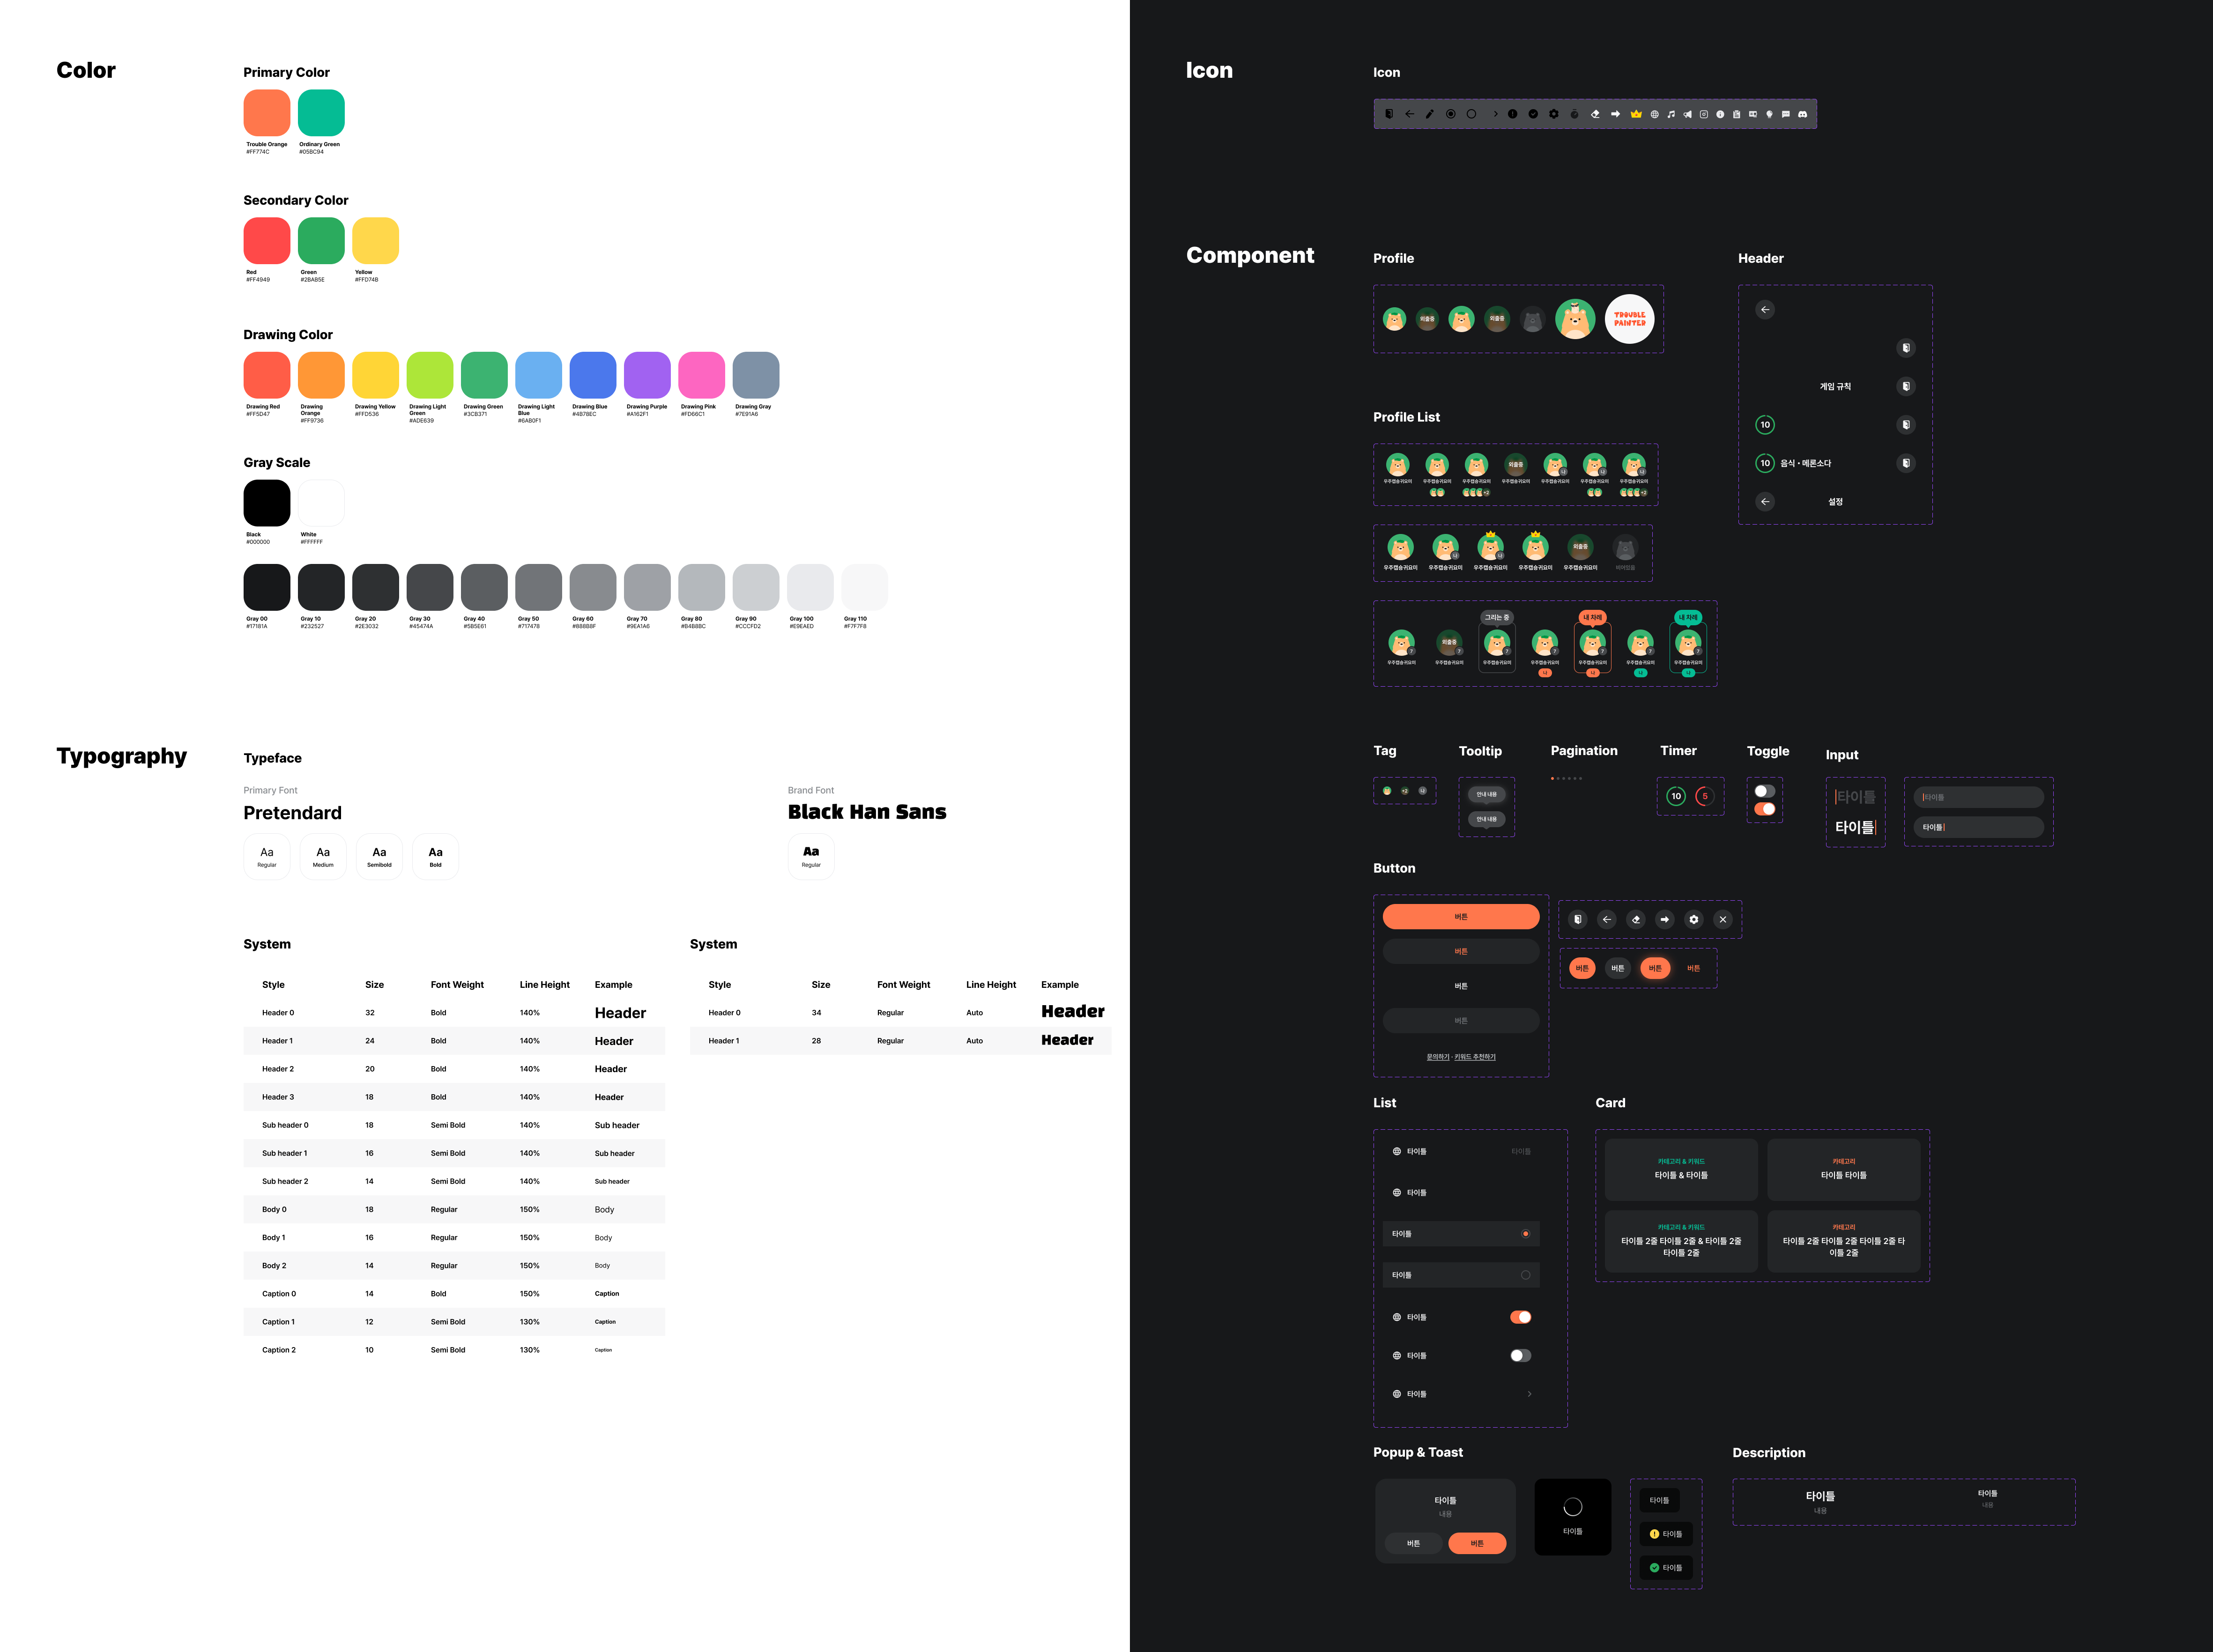 Design System
Backend
The backend server is currently running on a Raspberry Pi. I hope that one day, when there are many concurrent users, the Raspberry Pi will burn out and be moved to the cloud. 🔥
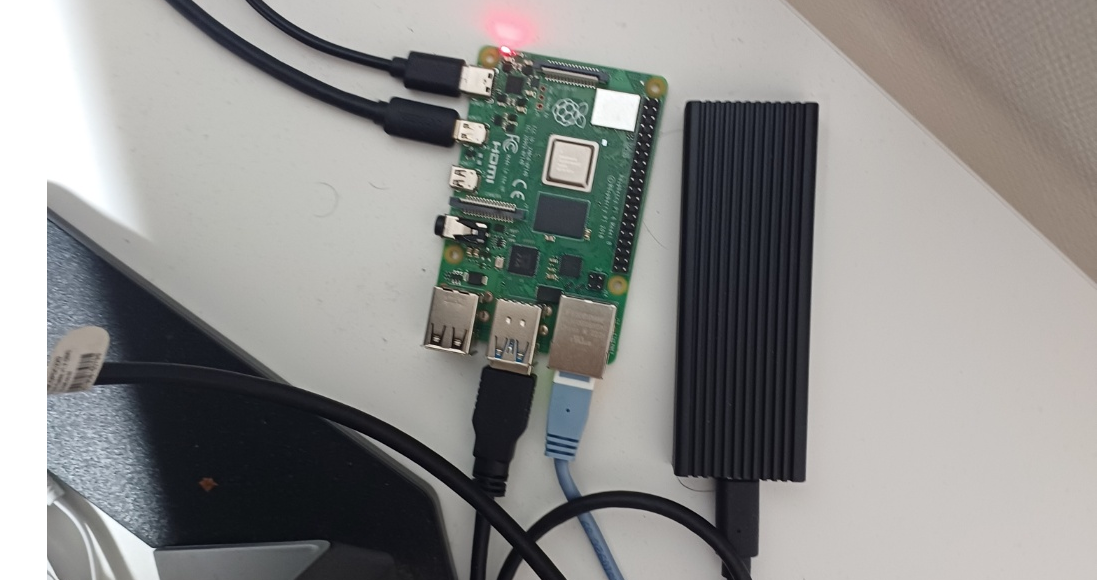 It doesn't cost anything because it's running on a Raspberry Pi 🥧
Architecture
The backend is implemented based on Kotlin & Spring Boot, and the detailed technology stack and architecture are as follows.
| Category | Stack |
|---|---|
| IDE | IntelliJ |
| Language | Kotlin |
| Framework | Spring Boot 3.2.5, Gradle |
| Authentication | Spring Security, JSON Web Tokens, Opaque Token |
| ORM | Spring Data JPA |
| Database | MySQL |
| External | Nginx, Docker, Redis, Kubernetes, ELK |
| CI/CD | ArgoCD, Github Actions |
| API Docs | Notion, Swagger |
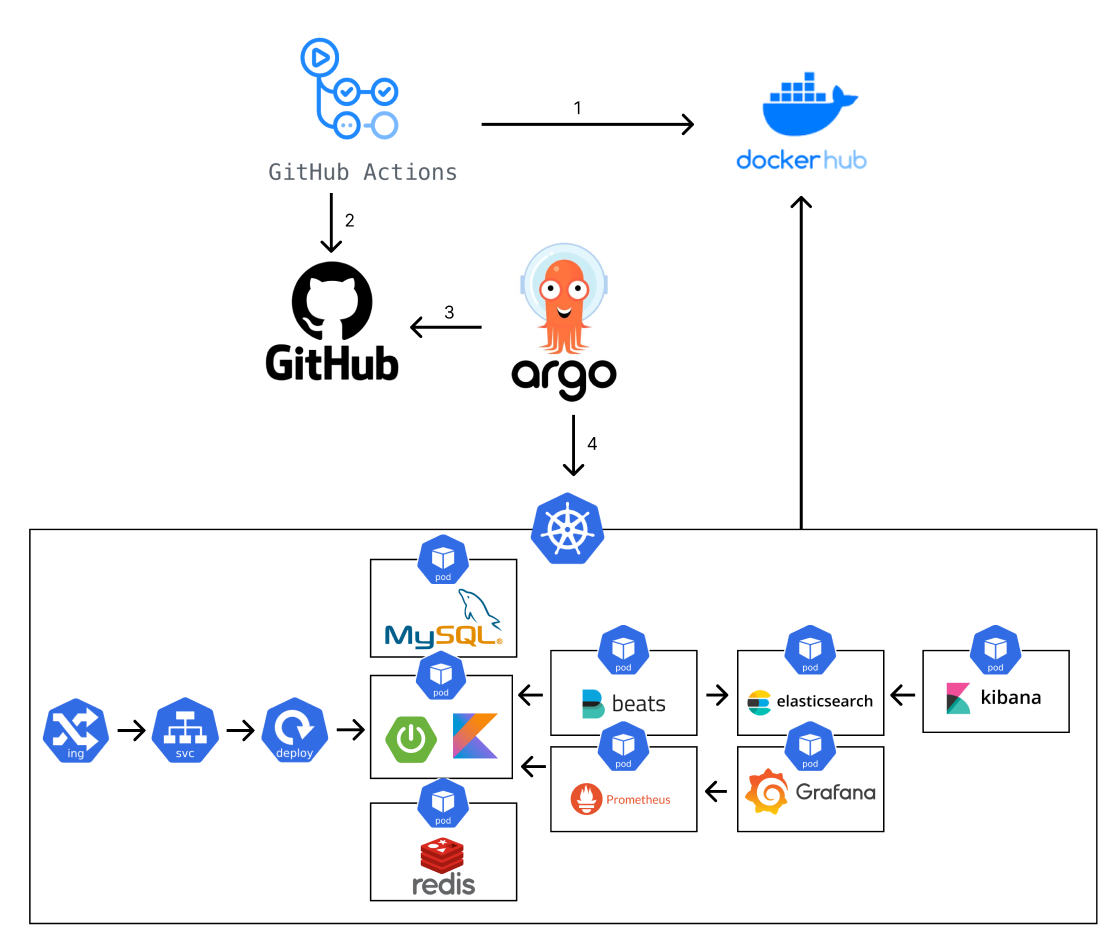 Backend Architecture
Monitoring
We are monitoring logs and real-time server status using Prometheus, Grafana, and Sentry.
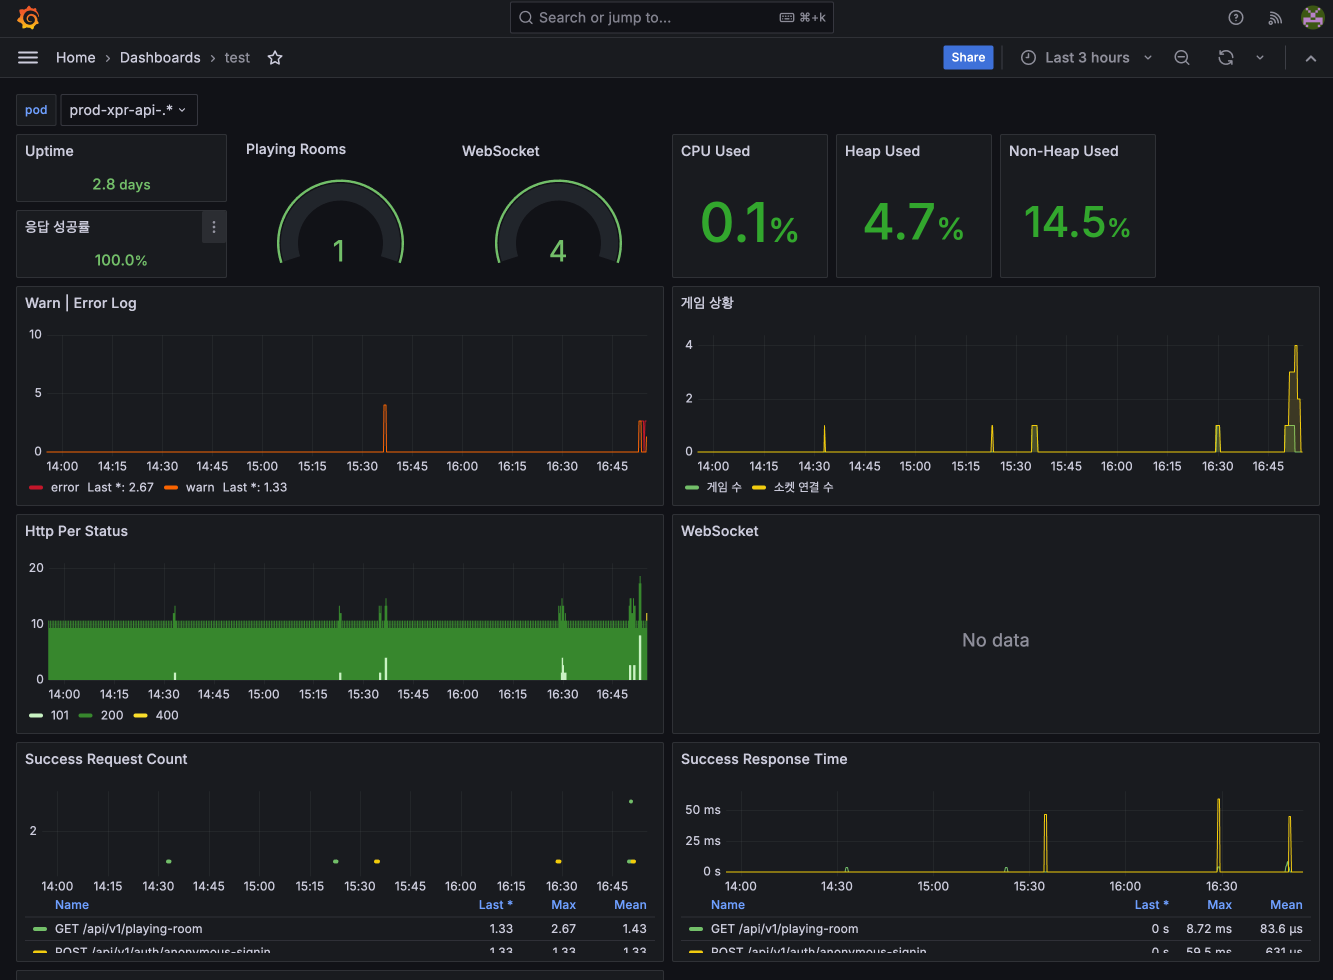 You can monitor the number of rooms playing in real time and the number of connected sockets.
Flutter
Trouble Painter is built with Flutter and uses the following technology stack.
 Flutter Technology Stack
| Firebase | |
|---|---|
| Analytics | Collecting metrics about app usage and user engagement |
| App Distribution | Distributing within Android & iOS teams |
| Cloud Firestore | MVP version server role for user testing |
| Crashlytics | Tracking app crashes and logging errors |
| Remote Config | Remotely configuring things like forced updates & announcements |
Gemini was used to implement a function that provides hints to the trouble painter based on the drawings made by players. For the application results, please refer to the previous post.
Flavor & Env
We used the flutter_flavorizr package to operate the development environment (DEV) and the deployment environment (PROD) separately. In the case of Firebase, since it is impossible to separate the Remote Config environment in one project, I separated the project into two and proceeded.
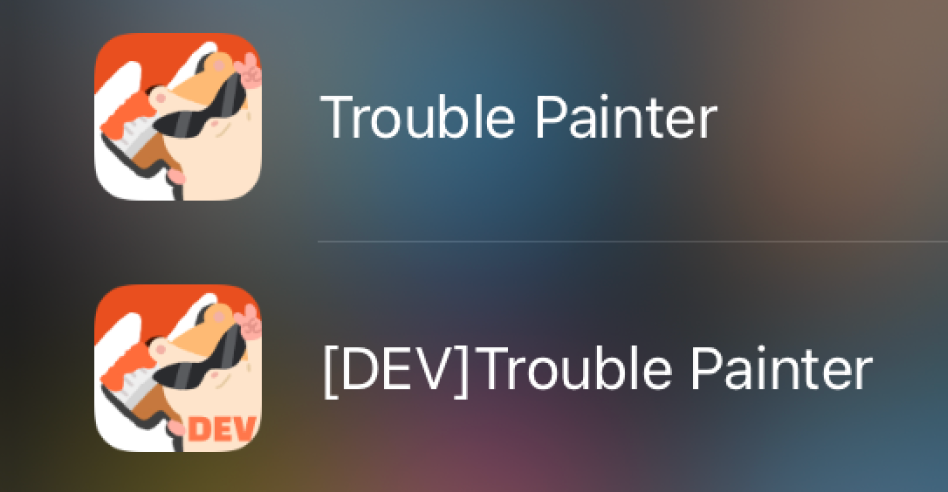 Apps installed for each environment
In addition, files that need to be applied differently depending on the environment are managed separately.
1 | .env |
Architecture
This project was designed using Clean Architecture and MVVM based on Riverpod, and the folder structure was implemented by separating the Presentation folder into the app folder in the Feature First structure.
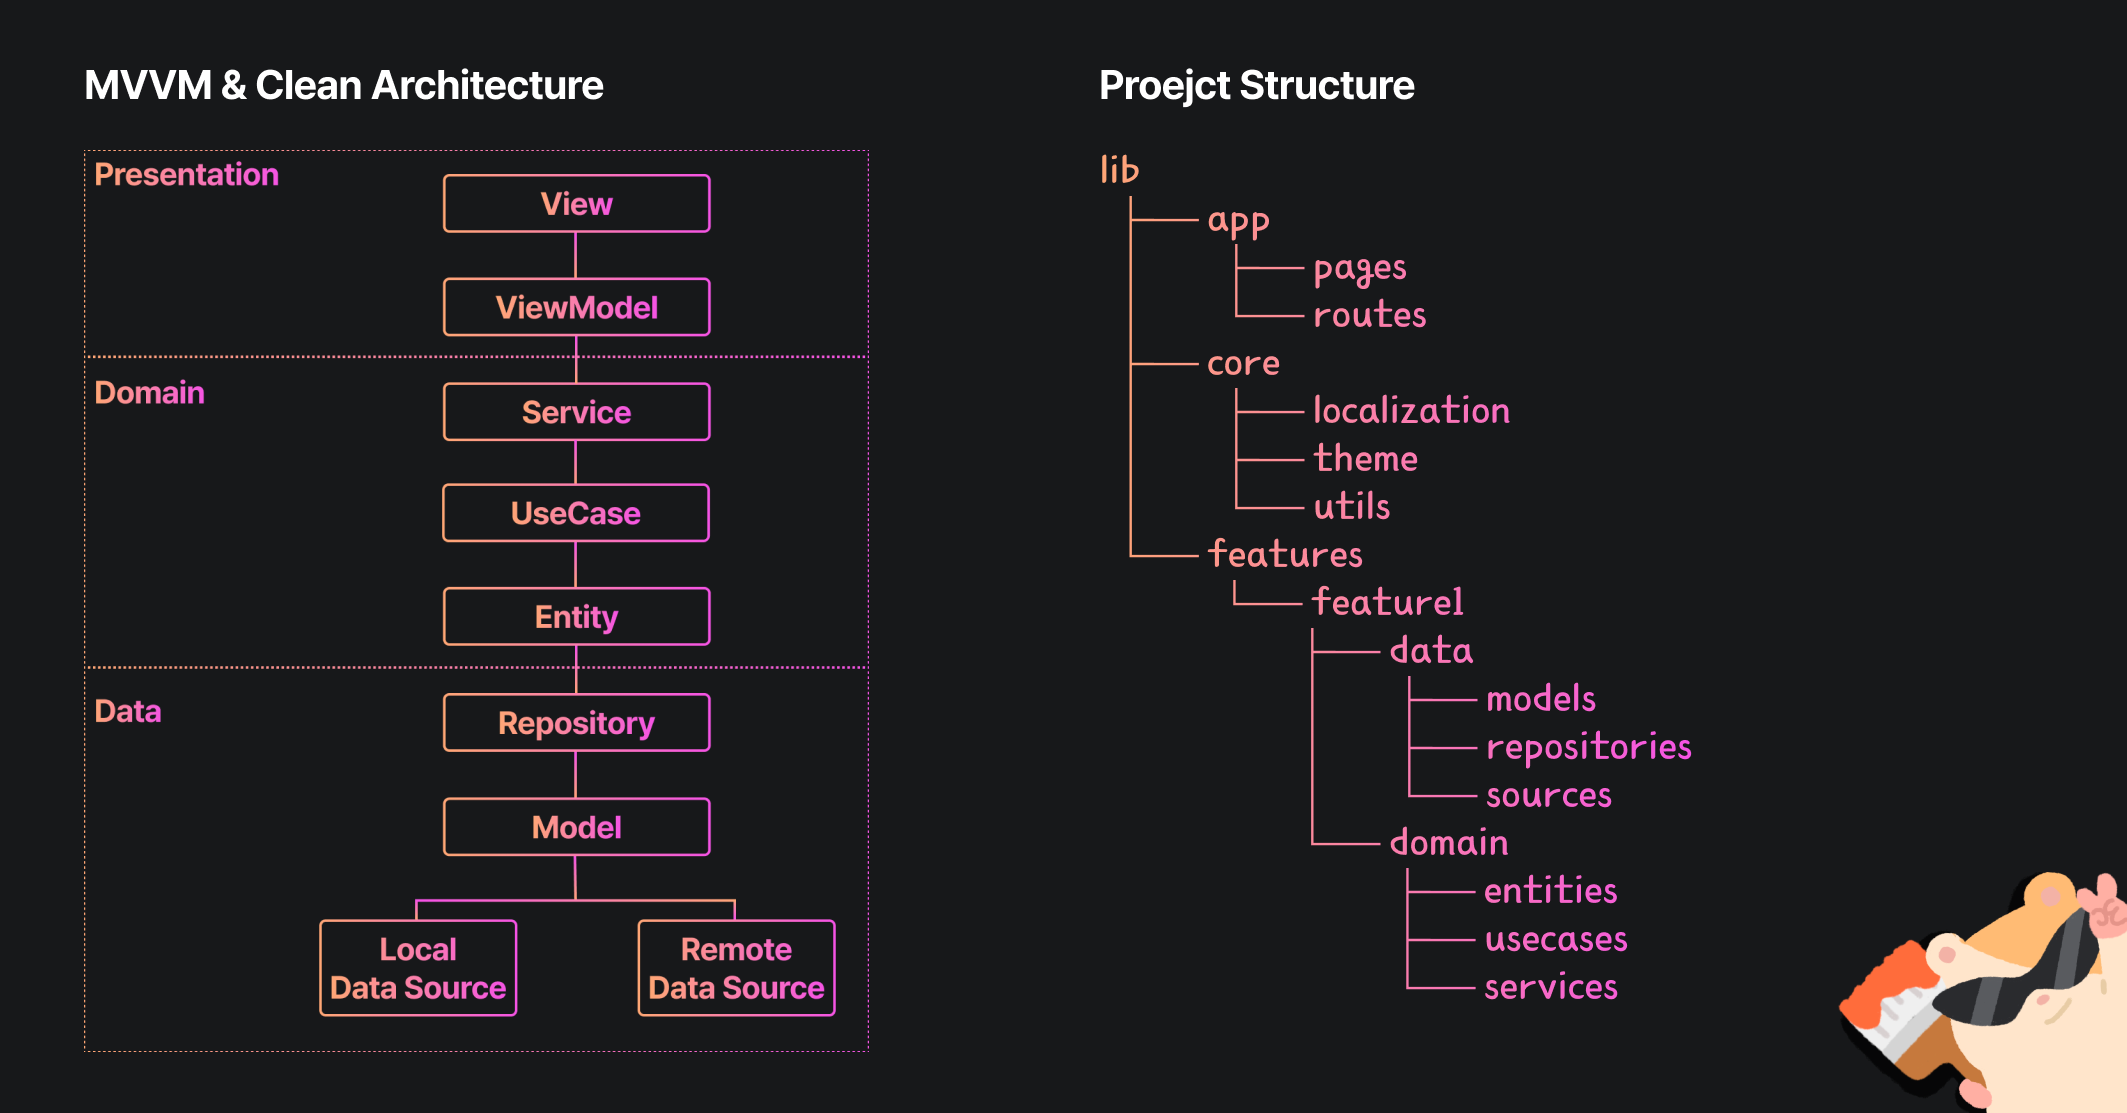 Architecture & Structure
The Flutter part in the team is responsible for combining the completed design and backend functions. In other words, it is a position that cannot run hard alone because it depends on the design and backend work.
Because the idea changed midway and there was not enough time, the Flutter team needed to secure some spare time by doing what they could even if they were unable to work due to dependency issues.
In Robert C. Martin’s Clean Architecture, it says the following:
Clean Architecture - Robert C. Martin
“Architects identify policies as core elements and make details independent of policies, so that decisions on details can be postponed or deferred.”
If we look at this a little differently, we can understand it as “You can create the core elements of the system even if the details are not decided.” and in this project, we took advantage of the dependency control of the architecture from the development stage and implemented the app’s functions based on the Wireframe in the beginning, and after the design came out by passing the ViewModel for UI test mode, we configured an environment where we can view the desired game screen and then proceeded with the work easily.
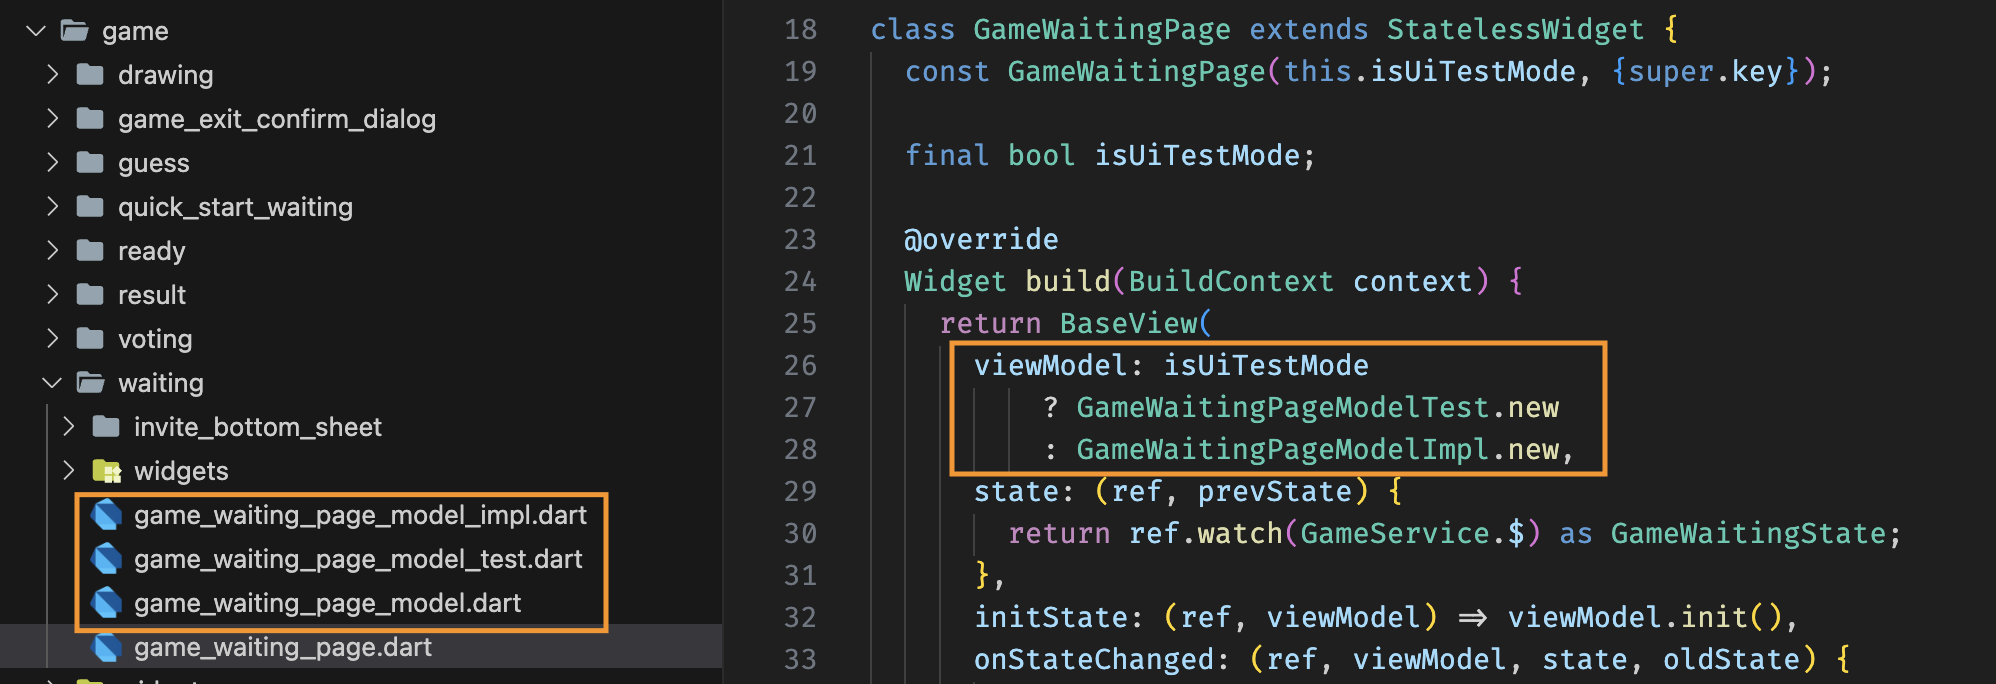 Since it is implemented with MVVM architecture, we can easily change the app's behavior.
Backend linkage code was isolated to the Data layer, and the data required for interaction was implemented as a Model class, and then converted to an Entity class when passed to the upper layer, so we could continue to use the existing logic in the domain layer.
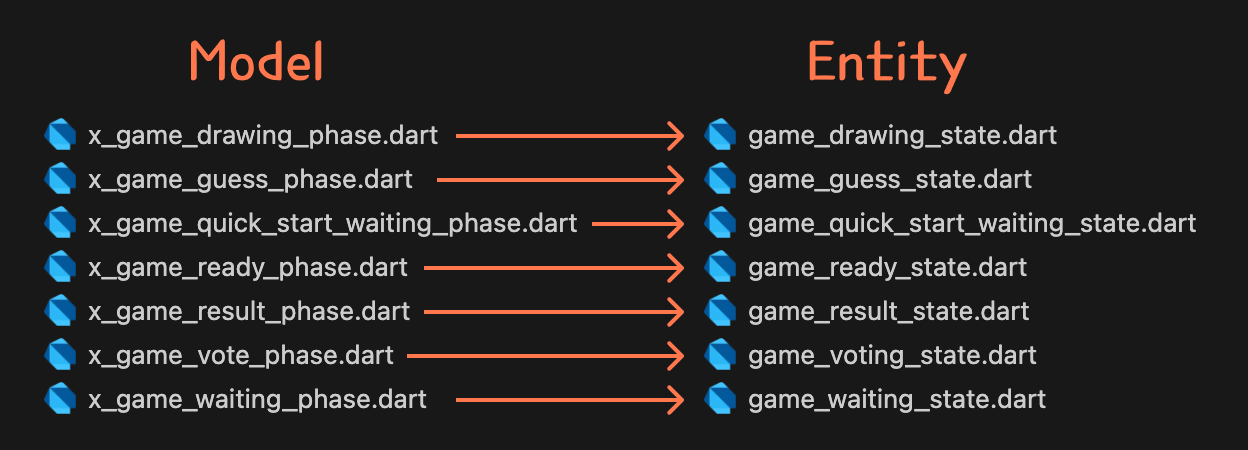 Model to Entity
Since the server dependency was isolated to the Data layer in this way, even if a new server is created in the future, the logic of the existing domain layer can be reused as is.
Riverpod
Riverpod was used for state management, MVVM, and dependency injection, and was modified directly without using the Code Generator.
In the Presentation layer, BaseView and BaseViewModel were created, internally generating a Provider, and implementing automatic inference of the Generic type, which greatly reduced the boilerplate code.
1 | /// No need to create a global variable. |
In the Domain & Data layer, it was mainly used as a Dependency Injection tool. Instead of assigning the Provider to a global variable, it was encapsulated as a static inside the class, thereby reducing global variables and increasing usability.
1 | class TodosNotifier extends Notifier<List<Todo>> { |
Design Communication
Trouble Painter requires at least 3 people to run the game, and the screens that can be viewed vary depending on the role. Therefore, we created and provided UI Test Mode so that designers can view the screens they want and give feedback at any time.
In addition, unlike the web, it is not easy to check the size of components in mobile app services, so we created a component page in the developer menu of the app to provide a way to view the size of components and animation movements.
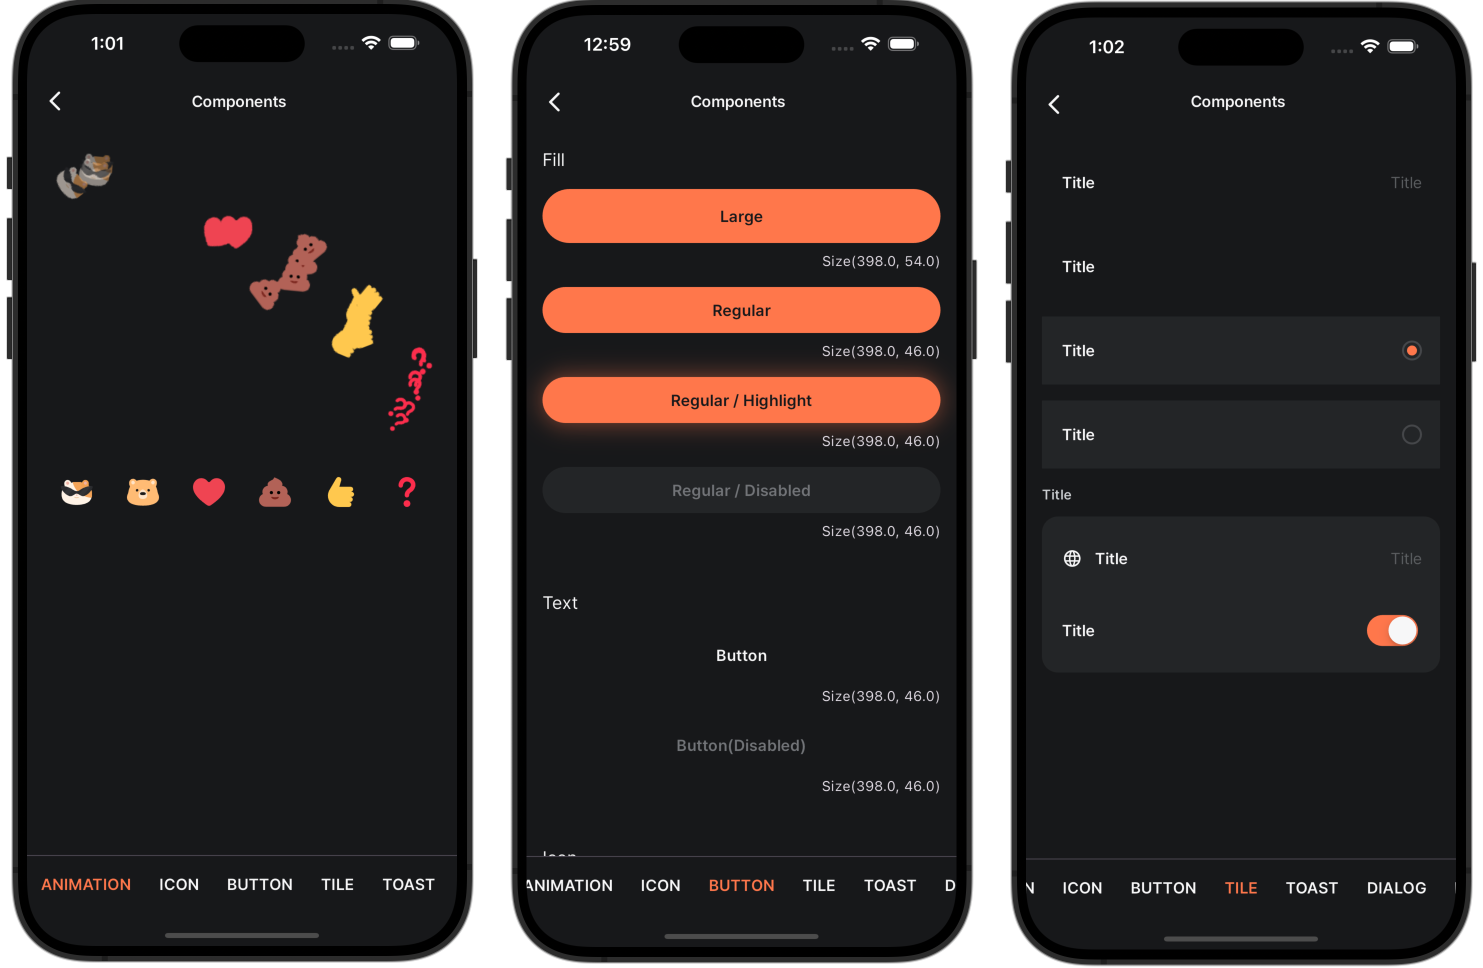 Component Preview
WebSocket Design
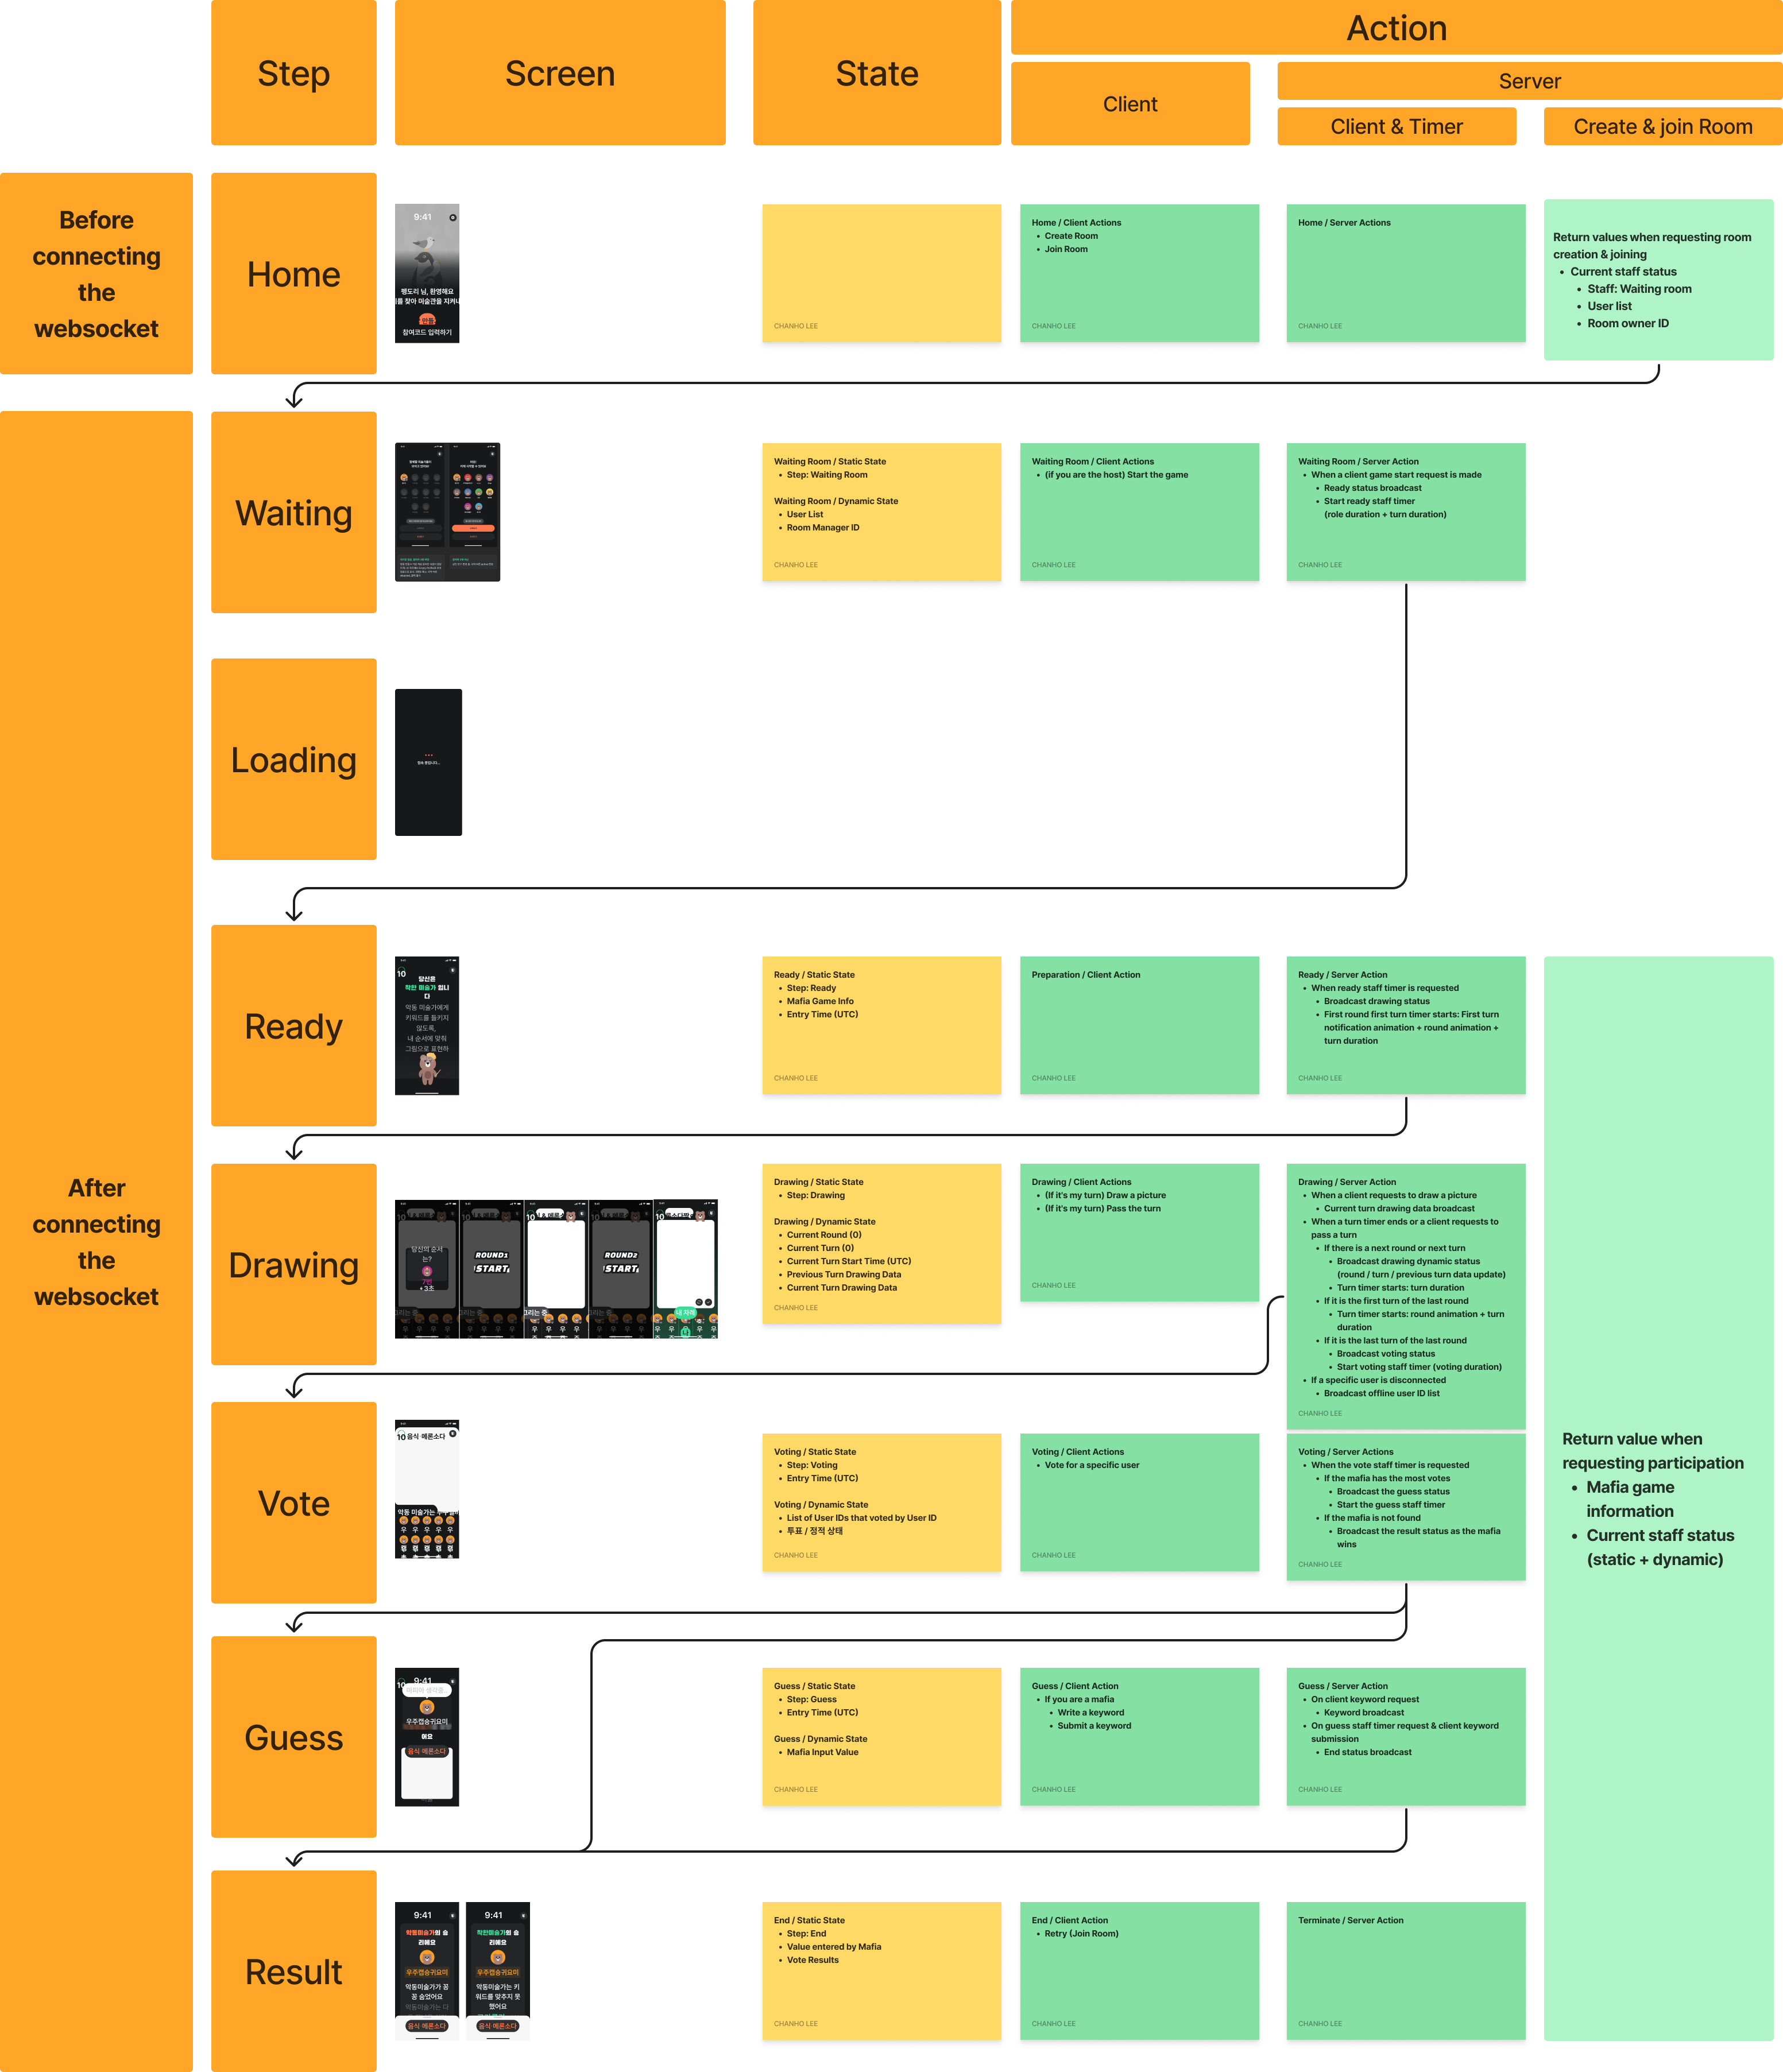
Real-time communication was implemented by creating a separate protocol based on WebSocket, and close communication with the backend team was required during the design process compared to HTTP-based APIs.
The differences between WebSocket and HTTP-based APIs that we learned during implementation are as follows. 1. Since the state exists, a synchronization process is required when reconnecting in the middle
2. Since routing depends on server-side broadcast, discussion with the server side is required when adding a screen
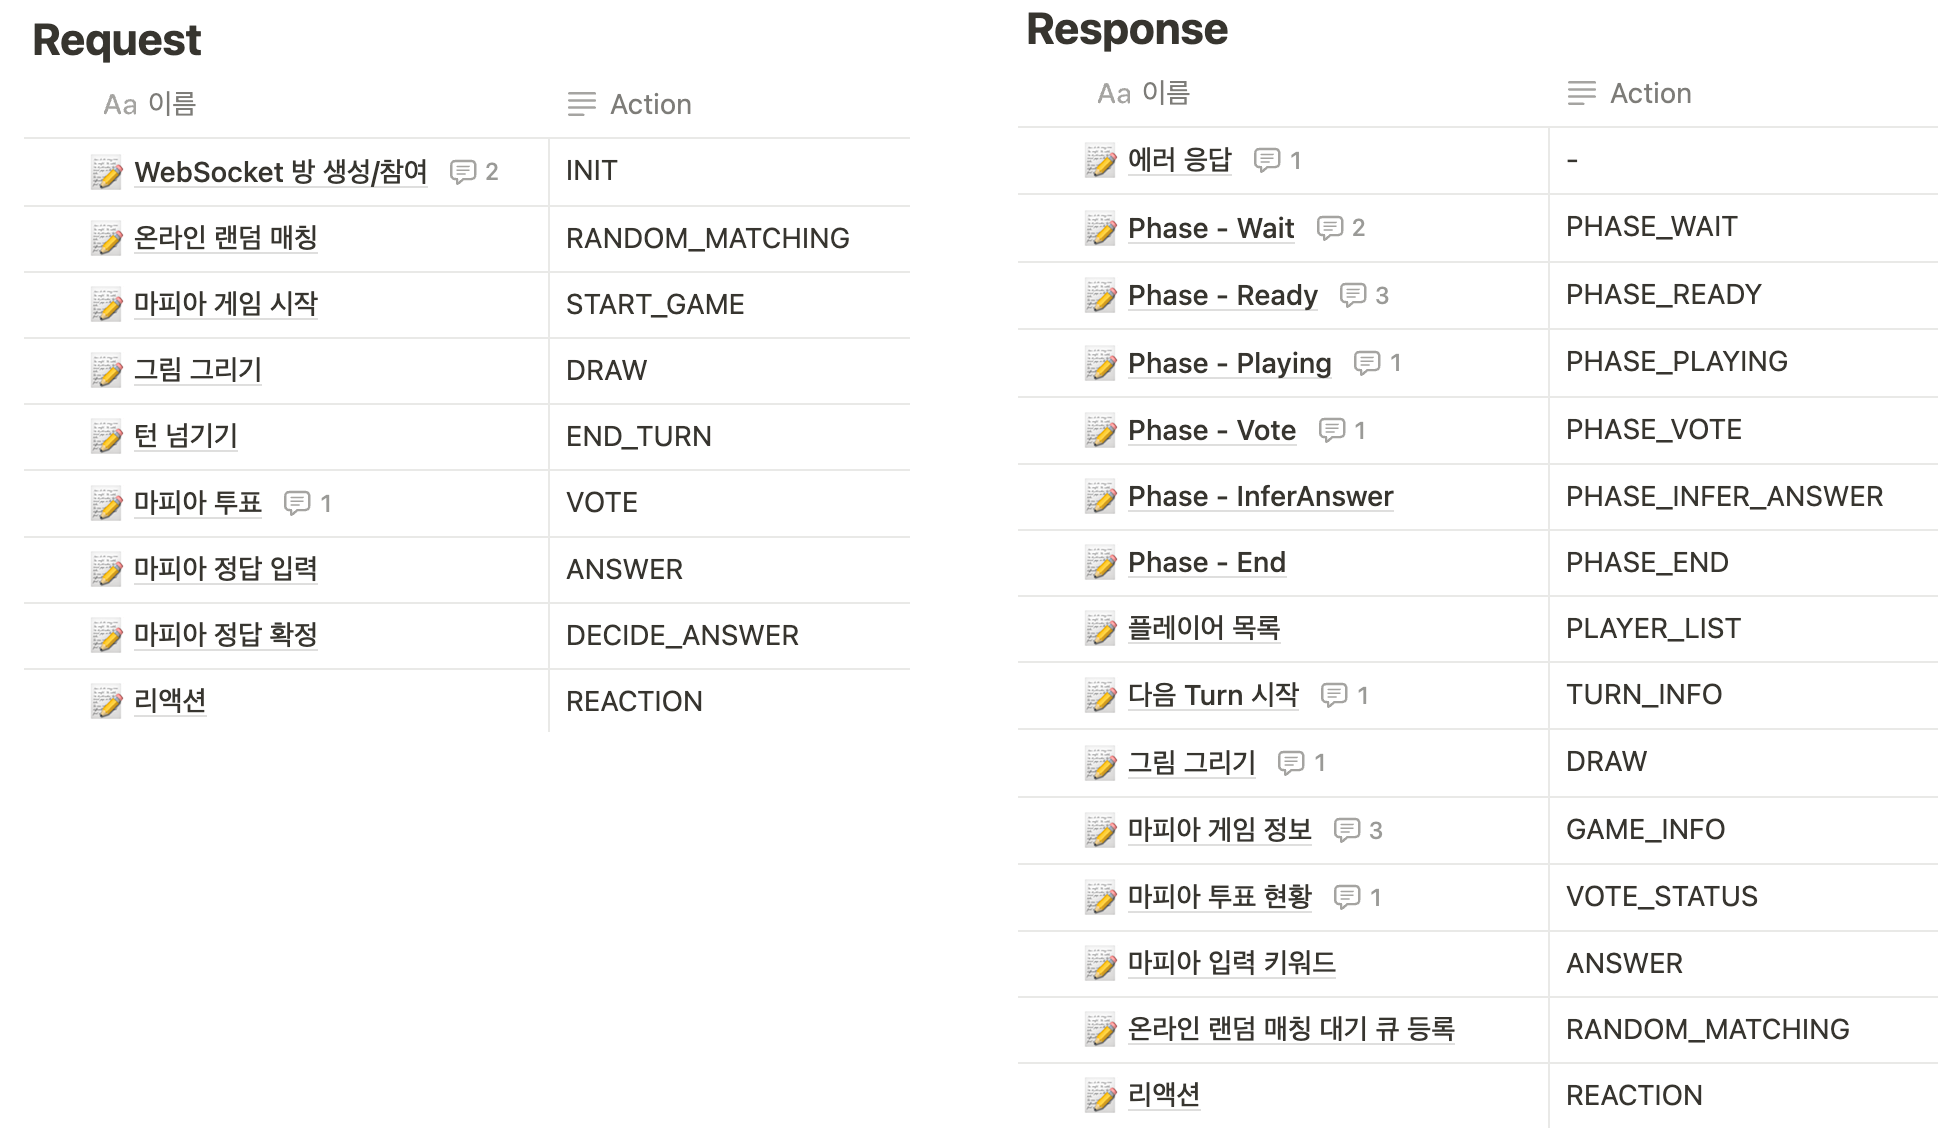
3. Requests and responses are not 1:1, so the documentation method is different
Since this is a game that is played in real time on a mobile device with an unstable network, the reconnection function was a necessary function that had to be implemented, and it was implemented by receiving a snapshot of the server-side state at the time of reconnection, synchronizing it on the client, and then receiving individual broadcasts.
For smooth communication, the necessary state for each screen and the timing of the routing screen transition were organized in Figma and communicated.
HTTP-based APIs could be documented with Swagger, but since WebSockets do not have 1:1 requests and responses, requests and responses were organized separately in Notion and communicated.
Animation Control
I had to implement a dialogue animation that tells you your turn and what round it is at the start of the game. The animation specs were provided by Protopie, and are summarized as follows.
- Dialog Fade In
- 3 second countdown
- Counter Fade Out
- Round Translate
- Dialog Fade Out
The problem is that when a user interrupts after a certain point in the animation, the animation should start from the same point as other users and end together. Otherwise, the drawing timer will decrease, but the pop-up will cover the screen, causing an unfortunate situation where you can’t draw.
To solve this problem, we implemented a way to control each animation with a single AnimationController, and then calculated and executed the server-side animation progress based on the interruption point. For detailed instructions, please refer to the official documentation and code.
Performance Optimization
On the drawing screen, a specific user’s drawing is broadcasted to all players in real time. In this process, as the number of drawings by users increases, more and more drawing data must be broadcasted in real time, so performance issues were a concern, so the following three methods were introduced for optimization.
- Implement real-time broadcasting of only the drawing data of the current turn, and merging it with the drawing data of the previous turn at the end of the turn
- Implement throttling to reduce the frequency of drawing data and broadcasting
- Apply the Ramer–Douglas–Peucker algorithm to optimize for lines with fewer points
Throttle and the epsilon factor of the Ramer-Douglas-Peucker algorithm were implemented so that they can be controlled in Remote Config.
Play video
Final
In this project, I was able to experience game making and drawing feature utilization that I had always wanted to try, and I also had practical experience with architecture, so it was fun. WebSocket was not easy, but it seems to be an attractive technology that stimulates curiosity to use it in more diverse ways.
I will come back next time with a more fun project :)
Part 1. Trouble Painter - Drawing Mafia Game
✔︎ Part 2. Create a real-time drawing game with Flutter
This project was open sourced and can be found at the Github link below.
👉 Flutter : Link
👉 Backend : Link