Object Detection 모델을 만들기 위해서는 오브젝트가 담긴 이미지와 이미지 상의 오브젝트의 위치와 종류를 나타내는 라벨이 필요합니다. 이번 프로젝트에서는 다음과 같은 순서로 데이터를 준비하였습니다.
✔︎ 데이터 준비 순서
Image Gathering
Image Labeling
Image Resizing
Image Generating
Image Gathering
이번 프로젝트에서는 램프, 전구, 형광등 총 3개의 물체를 학습하였고 이를 위해 다음과 같은 이미지를 수집하였습니다. 램프와 전구의 경우 ON/OFF 상태를 구분할 수 있도록 다른 클래스로 분리하였기 때문에 총 클래스 수는 5개입니다.
조명 인식 모델을 만들기 위해 사용된 이미지
동영상으로 해당 오브젝트들을 촬영한 뒤 각 프레임들을 이미지로 변환하는 방법으로 총 5천장의 이미지를 수집하였습니다.
OpenCV를 이용한 video to image
1
2
3
4
5
6
7
8
9
10
11
12
import cv2
for i in range(len(videoFiles)):
    cam = cv2.VideoCapture(videoFile)
    currentFrame = 0
    while(True):
        ret, frame = cam.read()
        if ret:
            cv2.imwrite(currentFrame + '.jpg', frame)
            currentFrame += 1
        else:
            break
    cam.release()
Image Labeling
Object Detection 모델을 만들기 위해서는 학습하고자 하는 물체가 담긴 이미지와 해당 물체의 종류 그리고 위치 정보가 기록된 label이 필요합니다. label의 경우 직접 수작업으로 데이터를 생성해야 하는데, 작업을 편하게 하기 위해 labelImg라는 오픈소스 툴을 이용하였습니다.
수집한 이미지의 원본은 1920 x 1080로 학습 시간이 많이 소요되기 때문에, Pillow 라이브러리를 이용하여 이미지의 크기를 10분의 1 크기인 192 x 108로 줄였습니다.
image resizing
1
2
3
4
5
from PIL import Image
for image_file in images:
  image = Image.open(image_file)
  resize_image = image.resize((192, 108))
  resize_image.save(new_path)
label resizing
1
2
3
4
5
6
7
8
9
10
11
12
13
14
15
16
defchangeLabel(xmlPath, newXmlPath, imgPath, boxes): tree = elemTree.parse(xmlPath)
# path 변경 path = tree.find('./path') path.text = imgPath[0]
# bounding box 변경 objects = tree.findall('./object') for i, object_ in enumerate(objects): bndbox = object_.find('./bndbox') bndbox.find('./xmin').text = str(boxes[i][0]) bndbox.find('./ymin').text = str(boxes[i][1]) bndbox.find('./xmax').text = str(boxes[i][2]) bndbox.find('./ymax').text = str(boxes[i][3]) tree.write(newXmlPath, encoding='utf8')
Image Generating
양질의 데이터가 많을수록 모델의 성능은 좋아지지만, 너무 많은 데이터는 직접 라벨링을 하기가 힘들기 때문에 라벨링을 완료한 5천장의 이미지를 이용하여 추가 이미지를 생성하였습니다. 이미지를 생성하는 다양한 방법들이 있지만, rotation의 경우 Bounding Box의 표기법의 한계로 인해 오차가 커지기 때문에, horizontal flip을 이용한 방법으로 이미지를 1만장으로 늘렸습니다.
horizontal flip
1
2
3
4
5
6
7
8
9
10
11
12
13
14
15
16
17
import random import numpy as np classRandomHorizontalFlip(object): def__init__(self, p=0.5): self.p = p
위 명령어를 실행하면 yolov3-tiny.weights라는 35.4MB의 weights를 다운받을 수 있습니다. YOLO3 자체는 C/C++로 구현된 DarkNet 프레임워크로 구현되어 있습니다. 이를 Keras에서 사용할 수 있는 .h5 포멧으로 변환해야합니다. 변환 방법은 Keras-yolo3의 convert.py 파일을 이용합니다.
# Get annotations_voc list for className in classes: annotations_voc = glob.glob(f'./data/light/label/train/{className}/*.xml') for annotation_voc in annotations_voc: image_id = annotation_voc.split('/')[-1].split('.')[0]+'.JPG' train_all_file.write(f'./data/light/image/train/{className}/{image_id}') convert_annotation(annotation_voc, train_all_file) train_all_file.write('\n') train_all_file.close()
마지막으로 학습은 train.py 파일의 _main() 함수에 다음과 같은 변수가 있는데 이를 수정하여 실행하면 됩니다.
train.py의 _main()
1 2 3 4 5 6 7
def_main(): annotation_path = 'data/light/train_all.txt'# 위 Convert Annotation의 결과 파일경로 log_dir = 'logs/000/'# 학습 로그 저장경로 classes_path = 'data/light/classes.txt'# 학습하는 클래스 목록 anchors_path = 'model_data/yolo_tiny_anchors.txt'# tiny YOLO 모델의 anchors transfer_learning_path = 'model_data/yolo_tiny.h5'# Convert Darknet Model To Keras Model 결과 h5파일 # ... 이하 생략
위와같이 수정을 한 뒤 실행을 하면 기존 pretraining 된 tiny YOLO weights를 로드한 뒤, 전이학습(Transfer Learning)을 시작합니다. 총 100epoch을 batch size 32로 진행하는데, 50에폭까지는 전체 44개의 Layer 중 42개를 Freeze 한 뒤 학습이 진행되고, 이후에는 모든 레이어를 Unfreeze한 뒤 학습이 진행됩니다.
하지만 Keras의 EarlyStop이 다음과 같은 조건으로 적용되어있어 전체 100epoch을 진행하기 전에 학습이 끝나기도 합니다.
또한 최적의 모델을 선택하기 위해 ModelCheckpoint 함수가 validation error 를 모니터링하면서, 이전 epoch 에 비해 validation performance 가 좋은 경우, 무조건 이 때의 parameter들을 중간중간 저장되고 있어서 학습이 도중에 멈추더라도 중간 결과물을 보존할 수 있습니다.
모든 학습이 완료되었으니 모델을 테스트하도록 하겠습니다.
Trained Model Test
1
2
3
4
5
6
7
8
9
10
11
from IPython.display import display from PIL import Image from yolo import YOLO

 YOLO v3 Architecture
 YOLO output
 조명 인식 모델을 만들기 위해 사용된 이미지
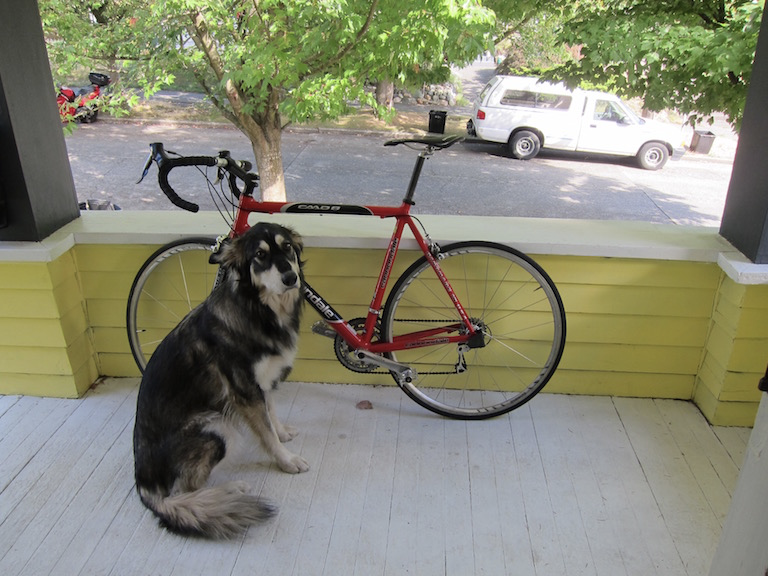 sample image : dog.jpg
 자전거, 개, 자동차를 탐지한 YOLO model
 전이학습이 완료된 tiny YOLO v3 output